Wildlife lovers who do not want to destroy ecosystems also suffer from underground diggers - moles. But what to do if you don’t want to kill an animal, but there is no time to evict the “guest” 101 kilometers away? You can try scaring moles away from your area instead of catching them in traps. Mole repellers are easy to purchase in a store, but many summer residents prefer to make them themselves.
Options from plastic bottles
The simplest version of a homemade repeller is a bottle placed on a pin. Also suitable for empty beer cans. The pin must be stuck into the ground so that sound and vibration are transmitted to the wormholes.
On a note!
Iron transmits sound better than wood.
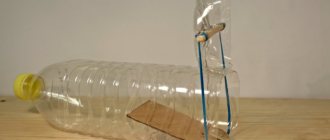
The most difficult option is a windmill against moles. To make it you will need a one and a half liter beer bottle.
Important!
The bottle must be of a “classic” beer shape. That is, with a narrow elongated neck.
In addition to the bottle, you need good scissors, a marker, a self-tapping screw with threads that do not reach the head, a nail, an awl and a windmill stick. Given the maximum complexity of creating such a mole repeller from a plastic bottle, there are no visual diagrams or drawings. There is only an extremely clear video.
- The bottom of the bottle is cut off along the horizontal line that is found on all plastic bottles.
- The cut bottom is turned over with the bottom up. The bottom has the shape of a five-rayed star. Using a marker, mark the areas that need to be cut out: from the border of the central circle strictly in the middle of the “ray” and from the middle of the central circle along the hollow between the “rays”. This part needs to be cut off. It turns out that half of the “beam” is cut out.
- The operation is repeated on all “rays”. The propeller is ready. All that remains is to punch a hole strictly in the center of the circle. The hole should have perfectly smooth edges and a diameter larger than the provided screw.
- Insert a self-tapping screw with the head “inward” into the resulting propeller and screw it into the center of the bottle cap until the thread runs out. To make screwing easier, you first need to make a small hole in the cap. On the inside of the cover, the self-tapping screw can be secured with a nut for reliability.
- Make two holes for a nail at the bottom of the bottle neck, strictly along the center line. The holes must be strictly opposite each other.
- Take an almost finished windmill and secure it to a wooden pole. Stick the pole into the ground in the garden.
When there is wind, the propeller makes a rather nasty noise, which moles are afraid of. The advantage of a windmill is that it will work in any wind direction. In fact, this is an ordinary weather vane.
It’s not difficult to make your life easier and drive the mole out of the garden. To do this, you need to make a pinwheel from a plastic bottle to scare away moles without any special frills, mounted on a pin. The diagram of such a turntable is below.
To enhance the effect, a metal pipe is buried in the ground below the level of the molehills. A pin with a mole ratchet is lowered into this pipe and the pin is secured in the pipe so that it does not dangle. The spinner works almost like a windmill, but depends on the direction of the wind. Sometimes the wind cannot rotate the repeller if the direction of the air masses is different.
The simplest skewer - DIY noise maker
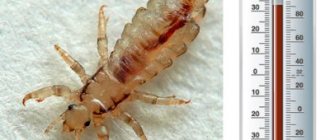
Keep in mind that the mammal is blind, but its hearing and sense of smell are impeccable. For this reason, it is important that the mole repeller made from a plastic bottle creates noise and vibration. This effect is achieved by blowing wind, which sets the device in motion: the blades rotate, transmitting sound waves downward: a resonance is created inside the ground, scaring off moles. Remember that to protect 6 acres you need to place about 3-4 small wind turbines.
If it is not possible to use several containers, then you can limit yourself to one. To work you will need:
- plastic bottle with a volume of 1.5-2 l;
- metal pin;
- part of a water pipe;
- construction or stationery knife.
The turntable manufacturing process is very simple. Do the following:
- Find the place where the mole passed, install part of the water pipe below the detected passage.
- Take the pin, place it in the installed pipe, secure the part with a plug or using a metal plate and self-tapping screws (tighten them until the caps fit snugly against the plates).
- Make a hole at the bottom of the container: its diameter should be larger than that of the pin.
- On the walls of the container, draw the letters “P” inclined to the side.
- Cut the blades according to the markings and bend them.
- Place the made plastic propeller onto the pin: it should go all the way to the neck, screw on the cap.
The simplest thing is to make a pinwheel that, when rotated by the wind, creates noise. The vibration is transmitted to the ground through the stand and scares away the animals. Birds and reptiles also prefer to stay away from the unknown. It should be taken into account that “motley ribbons” indeed have a “quarrelsome” character and may be offended by an unwelcoming reception.
- We mark 4-6 windows with a marker, evenly located on the side surface of the bottle. You need to choose a container with smooth sides.
- We cut through three sides of the marked rectangles.
- We bend the cut sectors, as shown in the photo.
- In the bottom and cap of the bottle we drill a hole slightly larger in diameter than the thickness of the rod. Using pliers, twist two rings of copper wire onto the rod. It will serve as a stop for the bottom of the container. We place the workpiece on the rod.
- We stick the rod into the ground not far from the place of the moles’ “crime”.
- For reliability, we install repellers every 10m on the site.
Another option is to make a ratchet to repel pests in your summer cottage from a beer can. As follows from the photo, the design is approximately the same.
The jar will emit sounds of a different frequency, which may be useful in conjunction with already made repellers. It is also useful to simply place several beer cans on metal pegs stuck in the ground. They will add new sounds to the overall “symphony”.
Beer can protects the interests of the garden
We almost forgot about “wind instruments”. To control pests on the site, it will be useful to bury several glass bottles halfway into the ground. The wind will definitely whistle in their necks, which the pests will definitely hear.
Tin repellers
Tin repellers
My favorite pastime at the dacha is drinking beer. And after the beer there are a lot of cans left. They can be used to make a beer can repeller.
The simplest option is to put the can on a metal pin. A light tin will sway under gusts of wind and knock on the pin. A little more complicated: hang the cans around the area on ropes so that they knock against each other. The most difficult option is to make a pinwheel.
Turntables made from this material are small and very light, but loud. A pinwheel from a beer can is made in the same way as from a plastic bottle: blades are cut out of it and bent outward.
A very interesting version of a homemade “tin” repeller in the photo below.
Such a mole repeller already requires certain skills in assembling mechanisms. The upper “bowls” catch the wind and ensure the rotation of the windmill. Pieces of tin tied below are knocking on a metal pole dug into the ground.
Step-by-step instructions for making a turntable
Learn the most popular method of making a mole pinwheel from a plastic bottle. The main stages of creating a craft are as follows:
- Cut the bottles in half: use a construction or stationery knife, and be extremely careful when doing the work. For a windmill, use the top of the containers.
- Using scissors, cut blades of the same size on the halves of the containers.
- Carefully bend the cut blades at the base at an angle of 45 degrees, slightly smooth out the bent elements.
- Use an awl to make holes in the center of the wings and lid.
- The bead is strung on a wire.
- The metal wire is threaded through the cap, the windmill, the second cap, the bead, the third cap, another blank, the fourth cap, the final bead.
- At the end, use pliers to make a bend to secure the elements strung on the wire.
Remember that the more parts and blades a turntable has, the louder its sound from the wind and the more impressive its appearance. If you decide to create a large mole repeller, then follow these instructions:
- Take a wooden block and make a hole in it: its diameter should be slightly larger than the diameter of the installation rod.
- Secure the covers on four sides of the bar using glue or galvanized fasteners.
- Cut oval windows on each side of the plastic containers.
- Screw containers with holes made to the fixed lids: as a result, the slots should “look” to the sides, and not up.
- Fasten the made structure to the pin, secure it on different sides with metal washers, and cover the top of the pin with a plug.
Alarm clocks
Mole repeller from alarm clocks
It is very easy to make a mole repeller from ordinary cheap battery-powered alarm clocks. Alarm clocks are set at different times to ring and the clocks are placed in jars with screw-on lids. The lids are sealed and the jars are buried in different places in the garden. Moles cannot stand the sounds of the alarm clock constantly coming from underground and leave the area.
The second option with an alarm clock: place it in a half-meter pipe, buried vertically. Holes are drilled in the bottom of the pipe for better sound distribution. This is what the pipe looks like.
The alarm clock is attached to a wire so that it can be easily reached.
On a note!
Of all the mole repellers, alarm clocks are one of the most effective methods. The only better repeller is a radio and speakers, but this type requires special knowledge.
The simplest skewer - DIY noise maker
The simplest thing is to make a pinwheel that, when rotated by the wind, creates noise. The vibration is transmitted to the ground through the stand and scares away the animals. Birds and reptiles also prefer to stay away from the unknown. It should be taken into account that “motley ribbons” indeed have a “quarrelsome” character and may be offended by an unwelcoming reception. For several days when dealing with snakes, it is better to wear secure shoes and trousers. Here is a master class on making a repeller from plastic bottles:
- We mark 4-6 windows with a marker, evenly located on the side surface of the bottle. You need to choose a container with smooth sides.
- We cut through three sides of the marked rectangles.
- We bend the cut sectors, as shown in the photo.
- In the bottom and cap of the bottle we drill a hole slightly larger in diameter than the thickness of the rod. Using pliers, twist two rings of copper wire onto the rod. It will serve as a stop for the bottom of the container. We place the workpiece on the rod.
- We stick the rod into the ground not far from the place of the moles’ “crime”.
- For reliability, we install repellers every 10m on the site.
Another option is to make a ratchet to repel pests in your summer cottage from a beer can. As follows from the photo, the design is approximately the same.
The jar will emit sounds of a different frequency, which may be useful in conjunction with already made repellers. It is also useful to simply place several beer cans on metal pegs stuck in the ground. They will add new sounds to the overall “symphony”.
Beer can protects the interests of the garden
We almost forgot about “wind instruments”. To control pests on the site, it will be useful to bury several glass bottles halfway into the ground. The wind will definitely whistle in their necks, which the pests will definitely hear.
A monument to a good drink and a mole repeller in one bottle
Comparison of homemade and industrial repellers
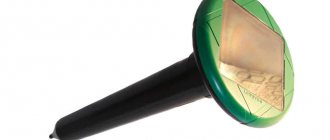
Of the industrial mole repellers, ultrasonic ones are the most popular. But according to reviews, not all of them are effective. They speak negatively about Russian-made ultrasonic mole repellers and praise Japanese ones.
According to homemade repellers, they note that moles have little fear of windmills and turntables, sometimes making a hole right next to the pin. Ringing alarm clocks or constantly playing modern music to the animals will effectively get rid of moles from the area.
B-52 strategic bomber against moles
It seems to me that anti-mole noisemakers for pest control in a summer cottage do not look very aesthetically pleasing and can be improved. At the same time, you can involve children in useful joint activities. Based on this, we put together a three-engine aircraft to repel pests.
To implement the idea, eight plastic bottles were required. The master class on making crafts is as follows:
- For the fuselage, a tall and thin bottle with smooth sides is better suited. Selected colors of the source material will decorate the repeller.
- For the motors on the wings, two small bottles with the neck cut off were used.
- From bottle number four we cut out wing blanks, as in the photo. The marker marks the places of cuts for attaching the wings to the fuselage.
- Cuts were made on the fuselage and engine housing to install the wings; they are also marked with a marker. Their length corresponds to the width of the connected wing, excluding the length of one cut on the wing.
- Now we bend one cut on the wing. It becomes narrower and fits into a slot on the aircraft body or engine. We insert the wing into the corresponding slot. The bent part on the wing straightens and secures the connection. We move the wing along the slot on the body so that it is held on both sides. To fix the structure, we pass an electrode or wire through the fuselage and wing. We also mount the second wing and motor.
- Three slots must be made on the rear fuselage for the tail and rear wings of the aircraft. Their length is determined by the size of the latter according to the above diagram.
- The photo shows the tail and rear wings of the aircraft. The slots for mounting are marked with a marker. The tail is made of two layers of bent plastic, and the wings are single-layer.
- We cut out three screws from the bottoms of the bottles according to the pattern marked with a marker.
- To secure the central screw, you will need a self-tapping screw and a washer. In the center of the screw, drill a hole slightly larger in diameter than the self-tapping screw.
- The plug is screwed onto the neck of the fuselage container. First put a screw on the self-tapping screw, then a washer. The self-tapping screw is wrapped in a cork.
- The propeller blades on the wings can snag the wing, so four washers will be needed.
- Before driving screws into the engines on the wings, it is better to first drill holes in the latter.
- The tail and rear wings are mounted in the same way as the front ones.
- Now you should determine the center of gravity of the model and in this place drill a through vertical hole in the aircraft body for installation on a metal rod. As when assembling a simple pinwheel from a plastic bottle, a stop made of copper wire should be mounted on the pin. A washer must be installed between the stop and the aircraft body.
Bomber ready for mission
Bomber - repeller of moles, birds and reptiles can be installed in the garden. We wish you a productive and interesting time. Let this specially selected video help you.