The best homemade mousetraps and how they are used
To combat rodents, a lot of drugs and devices are produced: poisons with an attractive odor, spring and electric mousetraps, ultrasonic repellers.
As a rule, purchasing these funds costs a pretty penny. A DIY mousetrap is practically free and does an excellent job of catching rodents. For people who are unable to kill an animal, such traps are the only way out: most of them lure a mouse into a trap without causing it the slightest harm. Let's figure out how to make a mousetrap at home simply and without much effort.
Disposable traps
Disposable mousetraps will have to be reinstalled after each rodent caught. To make them, improvised materials (ropes, bowls, plastic bottles) and simple tools (scissors and an awl) are used.
1 option
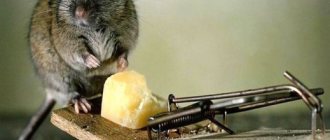
The classic mousetrap is a slamming lid, it’s quick and easy to make. You need a small container: a 0.5-1 liter jar, a deep plate, a disposable plastic cup. You will also need a coin or a nut; the bait is tied to them on a short string. The coin is placed on the edge and the edge of the container rests on it. The mouse pulls the rope while climbing into the jar, and it falls, preventing the pest from escaping.
This elementary mousetrap from a jar can be improved: instead of a coin, you can cut out a rectangle about 2 cm wide from thick cardboard or plastic and sharpen it on one side to make it convenient to place the bait on it.
Option 2
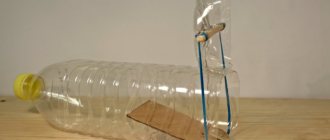
If food spoiled by rodents is found on the table, a disposable bottle mousetrap is most convenient. To make it you will need a bottle of 1.5 liters, a rope about a meter long, an awl and strong scissors. We cut off the neck of the bottle at a distance of about 5 cm from the cork, pierce a hole at the top with an awl and tie a rope through it to the bottle. The second end of the rope needs to be secured to the table, for example, tied to the handle of a pan.
To catch a mouse in such a bottle, it is placed on the edge of the table so that the bottom with the bait hangs in the air. The mouse, having climbed inside, overhangs it, the entire structure falls down and hangs on the rope. All that remains is to drown the rodent or take it outside the house.
Option 3
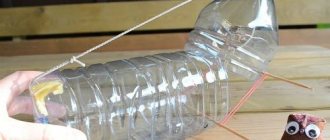
The simplest mousetrap, but at the same time quite effective, is made from a plastic bottle as follows: using a stationery knife, you need to cut the bottle into 2 parts at the place where it begins to narrow.
Turn the neck over and insert it into the main part, the sections must be placed at the same level and secured with tape or glued together. Bait is placed at the bottom of the bottle, the neck is lubricated with any edible oil. The mouse, once inside, slides down and cannot get out.
The only difficulty is that this plastic bottle mousetrap must be positioned so that the mouse can easily reach the neck, for example, near the shelves. You can make paths for mice to make it easier for them to climb. Then the bottles will have to be weighed down by adding some stones or sand to the bottom.
DIY mouse traps
A homemade mouse trap is an excellent solution for those who have children or pets. Store-bought ones may be too expensive. In order to make a trap, they use available materials that can be found in any home. Paper, glass or metal containers, ruler and wire - everything is used.
Interesting! Homemade mousetraps at home can be used several times in a row. There is no need to constantly update and monitor the status of the trap. This is very convenient for people who want to get rid of rodents in their country house.
Mousetrap made from a plastic bottle
One of the easiest ways to make a mousetrap is to use a plastic bottle. Every household has one, but to create a mousetrap it is recommended to use a container with a volume of less than 10 liters. The neck of one and a half to two liter plastic bottles is narrow, so a mouse can climb into it.
Unrefined vegetable oil is poured into it so that it covers the entire inner surface of the container. The cut neck is placed on a stack of books with an inclination of 40 degrees.
Second option
We cut a small hole in the upper part. We put bait on the bottom. We place the bottle on the edge of any surface, so that the part of the bottle with the bait hangs in a cantilever. We tie a rope to the other side. When a mouse enters your homemade mousetrap, it will run towards the bait. As a result, the entire weight of the structure will shift to one side, the bottle will slide down and hang on the rope.
Jar and bucket trap
You can make a mousetrap from a plastic or aluminum can mounted on a rod. At the same time ensuring its free rotation around its axis.
Video:
Jar trap
A homemade mousetrap made from a glass jar resembles a trap made from a plastic bottle. In order to make it, you need to take a three-liter glass bottle and a sheet of paper that will act as a funnel.
The jar is placed vertically, bait is placed on the bottom and a small amount of sunflower oil is poured. In order for the mouse to successfully climb into the jar, you can lean against a wooden ruler (a kind of bridge). The lid of such a trap is made of a sheet of paper secured to the neck with an elastic band with cross cuts.
The principle of operation of a mousetrap is quite simple. The rodent, sensing the smell of bait, makes its way across a wooden bridge onto an improvised lid and falls into the bottle. There is sunflower oil at the bottom, the animal’s paws slide along the walls, preventing it from getting out.
Bucket trap
The most effective trap is a homemade “trap” made from a bucket. The method seems primitive at first glance, but gives good results. To make a trap, you need to take a bucket and fill it with a concentrated salt solution. You need to mask the water with a thick layer of sawdust (fine). Sunflower husks or corn leaves work well. The layer of sawdust should be dense, so that after swelling, they float.
Attention! The bait used to catch the pest must have a special aroma and be located in the center.
Next, make a bridge from available materials (a board or a wooden ruler). Having smelled the aroma of bait, the mouse is unable to resist and goes for easy prey. The rodent ends up on a layer of sawdust and then falls into a concentrated salt solution, with no way to get out.
Glue trap
A do-it-yourself adhesive-based trap can save you a lot of money. You must first purchase a special glue for rodents and thickly lubricate a thick piece of cardboard with it. Bait is placed on the base. Trying to get food, the mouse runs onto the cardboard with glue and sticks with its paws or muzzle.
The animal dies as a result of severe thirst after a few days. The main disadvantage is that it is necessary to throw away the bait along with the dead rodent, which is not very pleasant for particularly impressionable people.
5 Best Glue Traps for Mice and Rats
Wooden
A wooden rodent trap or Zürner rat trap allows you to catch both mice and rats in your country house, private house, barn or barn. The advantage is that such a trap is not designed for one rodent, but can neutralize several pests in one night. You need to spend some time making a Zürner rat trap. First of all, you need to:
- Make a house that resembles a birdhouse with one difference - the hole should be located not in the front, but on both sides. The lid of the house should be removable, and the lower part of the box is lined with tin. Small planks are attached opposite the holes inside the house so as to form a bridge. Planks they are equipped with springs that allow them to be maintained in a certain position. In the house itself, above the bridges, the bait is attached to a thread.
The principle of operation is this: the mouse follows the smell of the bait, looks into the house and makes its way along the bridge. Under the weight of the animal, the board lowers, and the rodent falls down into a box pre-lined with tin. Under the action of a spring, the bridge returns to its place and is ready to receive new visitors.
Important! In addition to the positive aspects, there are a number of disadvantages to this method of catching rodents. Once caught in a mousetrap, the animal remains alive and something needs to be done with it later. In order to make such a mousetrap, you need to spend time. The resulting design is bulky and takes up a lot of space.
Glass jar and coin trap
One of the easiest ways to make a mousetrap is to use a glass jar and a coin. Take a small jar (preferably a liter). Turn it over onto the rim, put a small piece of the selected bait inside, and place a small coin edge-on under it.
Having climbed behind the bait, the animal catches the coin and the trap slams shut. The main disadvantage is that the mouse can touch the coin before it gets to the bait.
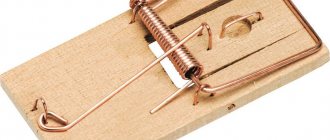
Hive
This type of mousetrap looks similar to a bee hive. In order to make a hive mousetrap, you need to take a special wire spring equipped with a ring. The spring is compressed and secured with a thread. Placed in a wooden hive house. The selected bait is also placed there. A mouse that has entered such a mousetrap begins to make its way to the bait and catches the thread with its teeth. When the thread is loosened, the spring sharply opens, firmly fixing the pest and preventing it from getting out.
Reusable traps
Making a reusable mousetrap is not much more complicated; the designs of most of them are elementary and do not require special skills. Such traps can be checked every few days, throwing away the caught rodents. True, they cannot be left for more than a week, otherwise the room will become saturated with the smell of decomposition.
The swing principle
The design of the first reusable mousetrap, which is easy to make yourself, is based on the principle of a swing. It will require any container with a volume of 5 liters or more with a wide neck: a bucket, a saucepan, plastic containers. A rigid wire, knitting needle or wooden twig is secured across the edge of the bucket using tape.
You also need a board several centimeters wide and slightly shorter than the diameter of the bucket. For example, a ruler or a rectangle cut from thick cardboard, plastic, or metal will do.
We place this board so that it rests on the knitting needle, one edge lies on the edge of the bucket, and the other with the bait placed on it is in the air. In order for the mouse to climb onto the board, a homemade mousetrap is installed on a stool at the edge of the table. You can make a ramp from a board and attach it to the trap.
To make the trap reusable, the balancing board must be attached to the spoke and positioned in such a way that it returns to its original state on its own.
Spinning drum
The basis of this trap is the same as the previous one: a bucket and a bridge leading to it. A rotating cylinder is used to drop the rodent into the container. To make it, you can take a small plastic bottle or tin can. A small hole is made in the bottom of the bottle, and then it is placed on a knitting needle. The knitting needle is placed on the bucket as an extension of the bridge and secured.
A bucket mousetrap will work for a long time if the bait is placed around the entire circumference of the bottle. You can spread it or attach it with a rubber band. The mouse, attracted by the smell, climbs onto the drum, it turns, and the rodent ends up in the bucket. If you do not plan to release the mouse outside the house, pour water into the bottom of the bucket so that it will choke.
Glue trap
When catching mice, you can also use special rodent glue. It is sold in hardware stores and supermarkets in the pest control section. According to the instructions, this glue is spread on cardboard, and bait is placed in the center. A mouse, even if it gets into it with one paw, is glued tightly. This is far from a humane mousetrap; the rodent in it dies long and painfully.
The disadvantage of this product is the ability of the glue to stick to curious pets and smear everything around. You can avoid this by building reusable homemade mousetraps. In a shoe box, a hole is made on the side for the rodent, under it inside the box there is a sheet of paper with glue applied, and in the depths there is a tasty-smelling bait. After that, all that remains is to replace the paper.
Disadvantages of Electronic Rat Traps
Like any electrical device, electronic rat traps can pose a hazard to pets and humans if not handled correctly. However, in fairness, it must be said that many modern models of electric rat traps powered by batteries, even with a gross violation of safety regulations during operation (for example, if you stick your fingers inside), are not capable of causing serious harm to human health.
On a note
The most dangerous devices to use are those made by yourself and powered by a 220 V mains voltage. Often, the circuits of such homemade products do not provide any protection - at best, a fuse that will not save you from a life-threatening electric shock.
In general, simple mechanical rat traps with a powerful spring can be considered much more dangerous to use than modern battery-powered electric rat traps. A trap can easily break a child’s finger or a cat’s paw, while electronic rat and mouse exterminators are designed in such a way that you cannot reach the electrodes with your fingers (or paw).
And even in the worst case, although the discharge will be very unpleasant for a person, it will not be fatal (a person is about 100 times larger than a rat, and the discharge power of a battery-powered device is simply not enough to cause serious harm).
It is also useful to read: Rat Death Poison No. 1: instructions for use and reviews of the product
Such traps also have other disadvantages:
- High cost - prices for electronic shredders start from 2,500 rubles and reach 10,000 rubles for the most modern models. For that kind of money you can buy several dozen ordinary mousetraps, or several tunnel traps that are safe for pets and are not inferior in efficiency to electric traps;
- Dependency on power supply. If the trap runs on batteries, they will have to be replaced periodically. If the device requires connection to an outlet, then it cannot be used where there is no network;
- The need to regularly check and release traps. If this is not done, then within a few days the rat will begin to decompose right in the device.
And yet, the main disadvantages of electric rat traps are their high cost and the danger to people and pets that is greatly exaggerated in the minds of the average person. This is what limits the popularity of these devices among the people.
Review
“When I was at my sister’s, I saw how they were fighting rats there. They have special electric rat traps for this. The rat climbs inside to get some bread, and then electrocutes it. While we were staying for a week, they caught three rats in their cellar. An excellent remedy, no brains scatter to the sides, no blood, I just took this trap, knocked it over, the rat fell into the bag - and that’s all ... "
Alina, Tver
Bait selection
World cinema has long convinced everyone that rodents love cheese more than anything else. In fact, catching a mouse on any dairy product is quite difficult. The most effective way to attract them to traps is to use:
- lard, especially smoked lard,
- smoked sausage,
- white bread croutons,
- unrefined sunflower oil,
- Sesame oil,
- roasted sunflower seeds and peanuts.
Bread soaked in sesame oil is most attractive to rodents.
Baits need to be changed periodically, because mice, sensing danger, stop reacting to the smell of the treat.
A mousetrap made from improvised means will not require much effort or financial expenditure, and the results from its use are often better than from industrial products. And in some cases there is nothing left to do but make a mousetrap with your own hands. It will take much less time than looking for a working store late at night or dragging yourself into town from your dacha. Having decided what materials are in the house, you can always find a suitable option from a huge selection of homemade traps.
Types of electric mousetraps
The action of destruction systems is based on a discharge of electric current, which kills a rodent caught in a mousetrap. The device is a plastic box. The bait is inside. The device may have mazes to disorient the rodent. When the device is ready for use, the green indicator lights up.
Electric traps differ from ultrasonic repellers in the effect they have on rodents. The first destroy the animals, the second expel them from the premises.
Device classification
Electronic mousetraps differ from each other in the following ways:
- Location of electrical discharge. In some devices, the energized plates may be located at the bottom. The animal dies when it touches them with its paws. In others, the circuit closes when you touch the feeder.
- Power source (batteries, electrical network 220 V).
- Number of entrances, tunnels (from one to six).
- Number of rodents caught. The device, designed for large populations, contains a storage container for collecting carcasses (up to 10 individuals). In small mousetraps, a chamber is installed for one individual.
Regardless of the power source, each rat trap is equipped with a starting capacitor to increase the strength of the electrical discharge.
How to make it yourself
You can make an electrical device against rodents yourself. Financial expenses in this case are minimal, and the efficiency is not inferior to purchased analogues.
Necessary materials
For a homemade electric rat trap, you need to prepare the constituent elements, namely:
- battery (12 Volt);
- aluminum or tin plates;
- capacitor (electric charge converter, 380 Volt);
- plywood sheet, wooden board (base).
You will need hardware and wires to connect electricity.
Step-by-step instruction
A homemade electric mousetrap can have different designs, but the operating principle is the same. Death occurs from a discharge of electricity.
How to make a rat trap from a battery:
- Metal plates are attached to the substrate with self-tapping screws (nails) (the distance between them is 1-2 cm).
- Wires are connected from the battery through the capacitor to the plates. To one (+), to the other (-).
- Bait is placed on the metal part of the trap.
- On the approach to the food, a tunnel is built that imitates a hole. You can make it from a plastic bottle. The structure is installed so that the rodent steps on two plates at the same time.
The body of the animal serves as a conductor of electric current. The plan for eliminating rodents is simple. By stepping on both electrodes at once, they close the circuit on themselves and die from the discharge within 2-3 seconds.
Additional Information! As bait, you need to use products with a pronounced aroma. Smoked lard and bread fried in unrefined sunflower oil will attract mice faster than cheese. Rats react to the smell of fresh meat and sausage.
How to choose a ready-made model when purchasing?
To choose an effective means of eliminating mice, in the store you need to study the technical characteristics of the models presented and compare them with your needs.
Recommendations for choosing a mousetrap:
- Depending on the number of rodents, multi- or single-place devices are chosen.
- The plastic body of a good trap should not emit a strong chemical odor.
- If there is no electrical outlet in the room, you need to buy a device that runs on batteries or a battery.
- Safety in use. Equipment must be protected from contact with dangerous elements.
- Equal effectiveness from mice and rats.
Operating principle of electric rat traps
The operation of an electric rat trap is based on a simple principle: an animal, climbing into the rat trap and trying to pull the bait out of it, closes an electrical circuit on itself. A high voltage current passes through its body, which leads to almost instantaneous death of the animal.
On a note
In some types of traps, contacts are made on the animal's paws when it climbs into the rat trap. In other devices, the rat receives an electric shock when it touches a baited feeder. Theoretically, in the first case, the rat has a chance to escape, but there is no practical difference in efficiency between devices with different circuits: rats are equally reliably destroyed by traps of both types.
It is clear that for reliable destruction of the pest, the voltage on the electrodes of the device must be high enough. To do this, voltage converters are often used, which make it possible to convert low voltage from batteries into several thousand volts at the output. So, in some traps, a rat or mouse receives an electric shock with a voltage of up to 8000 V (although the voltage can be lower - the standard 220 V is also quite “enough” for a rat).
Due to voltage converters, some electric rat traps are autonomous, run on batteries or rechargeable batteries and do not require a connection to the network.
TOP 5 popular models
Electric traps for rats are modern devices that destroy rodents almost instantly, without a trace of blood. Animal carcasses can be disposed of in a waste container without contact.
Antirats-190
The rat trap retains its working properties at temperatures down to -30 C and high humidity (95%). The voltage is located inside the plastic box, so the device is safe to use. The design is of a tunnel type. There are 6 inlet holes on the side wall.
Size W*D*H (cm) - 13*22*11. Power sources: C batteries (4 pcs.), el. net.
Manufacturer: Russian company i4Technology. The company's products are reliable.
Victor
The trap is designed in the form of a tunnel, which protects against accidental electric shock when touching the inside. It is equipped with 2 tension plates.
Power source - AA batteries (4 pcs.). The charge is enough for 100 rodents.
Victor Multi Kill
The rat trap has 2 entrances and a storage container. There are 3 plates in the discharge compartment. Its feature is an automatic revolution after a discharge. The dead animal ends up in a chamber, the size of which allows you to collect up to 10 carcasses.
Recharging occurs automatically after each operation.
Power source - “C” batteries (4 pcs.). The kit is designed for 150 mice or 50 rats.
Electronic Mouse Trap
The Victor brand mousetrap has a cone grip technology that captures the animal. Electric discharge for 5 seconds. kills a rodent. The entrance imitates a hole, located near the wall, in the path of the mouse. Beveled tunnel partitions protect fingers from 2 tension plates.
Power source: 4 AA batteries.
The Victor brand is manufactured by the American company Woodstream Corp, which has experience in rodent control since 1898. The popularity of the products was brought by the use of innovations.
- Power cut off when the door is open.
- Use of safe materials.
- LED notification method.
- Reliability of shockers.
- The design of electronic equipment is designed so that the human hand does not touch dangerous parts.
The disadvantage is the high cost of traps (from 1500 rubles). The price depends on the model.
GH-190
An 8 kW electric discharge destroys the rodent. In offline mode it performs up to 40 discharges. Made from fireproof plastic. The top cover is removable, allowing for hygienic cleaning. The device is designed for 1 individual. After removing the animal’s body, the apparatus must be washed and dried.
The device must be used in a place inaccessible to children and pets.
Dimensions W*D*H (cm) - 13*21*11.
Power sources: from a 220V network, from 4 “C” batteries.
The manufacturer of the rat trap is Chinese.
Electric mousetraps are a humane way to kill rodents. The death of the animal occurs instantly, in contrast to mechanical methods of killing, where the animal dies a painful death: in a bucket of water, on an adhesive backing, clamped in a trap.
Note! When using an electrical apparatus, care must be taken. Install the device in accordance with the instructions.
The animal must be removed immediately after death, preventing decomposition.
Rules of application and safety measures
Electric rat traps are quite easy to use. To catch a rat you need:
- Place bait in the device - for this there is a special feeder on the inside of the back wall of the device;
- Connect the rat trap to the network or insert batteries into it - depending on the model;
- Install the device where it can be easily reached by a rat or mouse attracted by the smell of the bait. It is advisable to choose a place to install the trap where pests are most often (where they leave their traces);
- From time to time (but at least once a day) check the indicator signals in the rat trap. Each model has its own mode of operation of the indicator, described in detail in the instructions;
- After catching a rat, you simply need to tilt the trap so that the animal falls out of it. If the corpse needs to be removed from the device by hand, the power in it is first turned off. In a model with a storage chamber, only the chamber itself is cleaned.
On a note
The Victor Rat Zapper Ultra is sold complete with a remote indicator that can be placed in an easily accessible, visible location. This is very convenient: the rat trap may be somewhere in the pantry behind a box of potatoes, and it will be difficult to look there regularly. It is enough to put the indicator on a shelf in the room and only check it. The rat catcher will only need to get it when the corresponding light comes on, indicating that the rodent has been captured.
Minced meat with onions, smoked sausage, scorched lard or bread lightly moistened with vegetable oil are good baits for rats.
It is also useful to read: Remedies against rats and mice and the nuances of their use at home
Electric rat traps should only be used in areas where children and pets are not present. The exception is the Victor Multi Kill Electronic Mouse Trap, which is well protected and does not pose a danger to pets and humans.
Electric traps should also not be used outdoors. Here harmless and sometimes very useful animals - shrews, birds, hedgehogs, lizards and snakes - can climb into them and die. In such cases, the harm to the site will be greater than the benefit from destroying the pests with a trap.
Conclusion
Electric mousetraps are a technological invention for eliminating pests of the mouse family.
- The principle of operation of traps is a high-voltage discharge of current, which leads to the death of rodents.
- An electric rat trap is quite easy to make with your own hands. Basic electrical knowledge will come in handy.
- You need to choose a ready-made device based on your needs, safety and reliability of the trap.
- There are options for rat traps from various companies on the market. The TOP 5 includes the best models from well-known manufacturers.
The electronics in the traps allow you to monitor readiness for operation, dead rodents in the container, and charge level.
Inhumane approach to rodent extermination
Poisons and chemicals intended to poison mice have a number of disadvantages:
- addiction of individuals to poison;
- refusal of bait;
- poisoning of pets.
And the most significant drawback is the death of the rodent from poisoning in a place inaccessible to humans, followed by the unpleasant smell of decomposition for a fairly long period of time.
A humane solution to the rodent problem
Gentle ways to get rid of creatures are ultrasonic repellers and a contactless trap-container, which, if caught, remains alive and well.
More bloodthirsty methods are glue fishing, chemical poisoning and mechanical traps.
A modern invention - an electronic mousetrap - is the most humane, so to speak, method of exterminating pests, since it leads to the instant destruction of an individual without suffering. You can also make a humane mousetrap with your own hands from available materials!
Operating principle of an electronic mousetrap
A modern electronic mousetrap is a specialized trap for small rodents that releases a strong electric current when the animal gets inside. Unlike ultrasonic repellers, traps destroy mice, which helps to completely clean the room of toothy pests.
The operating principle of an electronic mousetrap is extremely simple: a rodent, lured by the aroma of a treat, climbs inside the trap and receives an instantly fatal discharge of electric current with a power of 8000 V.
In addition, the design of the mousetrap is designed in such a way that the mouse is attracted to the rounded shape of the entrance to the trap, this reminds the animal of gnawed passages. And together with the fragrant bait, these factors do not give the rodent a chance to pass by.
What types of mousetraps are there?
For better visibility, here is a brief description of the main types of mousetraps used to control rodents:
- Mousetrap on a spring. The simplest and cheapest option. The spring is tensioned and the bait is placed nearby. The mouse, pulling the bait, activates the spring, and it slams the animal;
- Traps. The principle of operation is the same as that of a spring mousetrap, there is a slight difference in design;
- Cage mousetraps. A gentle method in which the animal remains unharmed and can be released;
- Glue. This is precisely one of the most cruel methods of extermination. The animal, stuck to the trap, dies a long and painful death from hunger and dehydration;
- Homemade devices. Our people are rich in wisdom and worldly tricks. Many craftsmen are able to invent something of their own to combat rodents, but the principles of operation of such devices are the same as those purchased;
- Electronic mousetraps. Modern traps, which are discussed in this article.
How did I make an electric mousetrap?
I lived in a wooden house then. The rats have won! Either I didn’t have a cat at that time, or he couldn’t cope with so many gray bandits - I don’t remember now. It was necessary to do something urgently. “Store” mousetraps did not help. The rat is a cunning animal! For her to circle this very mousetrap (or trap) around her tail is like punching a hole in a bag of bread on the table with her teeth - it’s a piece of cake!
And after finding the valve, Madame Idea came: I came up with the idea of using this valve to make an electric mousetrap. Well, or rat traps, whichever you prefer... I decided to make the top and bottom of the trap from edged “four” boards to use as load-bearing parts for the entire structure, the door and side walls were made of plexiglass (easy to handle and quite strong) , and the rear retractable wall is made of ordinary glass (for transparency).
In the board of the lower base, a little further from the supposed middle of the rattrap, I cut a shallow (less than 1 cm) transverse groove about 3 cm wide. Then I covered the “working space” (floor) of the future mousetrap (and still - mousetraps or rattraps?) fibreboard. I also cut a plate from fiberboard to the size of the groove taken out in the floor. Without further ado, I placed two bare wires in the groove, crosswise, barely touching each other. Then I closed the groove with the wires with the prepared plate, gluing it to the hinges. I made the hinges myself, simply twisting them from strips cut from a tin can. Instead of an axis for the loops, I used thin straight steel wire.
The entire structure was made in such a way that the “floor” in the trap seemed smooth, but as soon as the animal stepped on the movable plate, it moved down and the wires were short-circuited. I brought both wires, now no longer exposed, to the top board. On the upper base, closer to the end of the door, I attached my find - the core of the solenoid valve - with a homemade bracket.
I note that I made both bases - the top and the bottom - longer than the side walls almost exactly to the height of the door, which I attached with the top edge on a small hanger to the underside of the top base. Thus, when the door was fully open and in a horizontal position, its edge almost coincided with the end of the top board. At the bottom edge of the door I strengthened the wire bracket so that its semicircle, when the door is open, protrudes above the surface of the upper base. When the door is raised, the bracket is practically pressed against the end of the top board.
I think the ever-wise reader understood the essence of the idea long ago. I attached a wire to the valve stem like a long flexible “pin”, which was inserted into the semicircle of the bracket and kept the door raised. The rat enters the rat trap, steps on the movable plate, the contacts close, the electromagnet is triggered, the rod retracts, pulls the “pin” with it, it jumps out of the bracket, releasing the door, the door falls under its own weight and slams shut. All! The beast has been caught!
In order for the door to close securely when it slams, I attached a wire bent at an angle to the surface to the “floor” in front of the entrance to the trap: when the door falls, the edge slides freely along the wire, it bends, but then, when the door is closed, it straightens again, rests against door without allowing it to open.
At the end of the upper base (bottom), I installed break contacts so that my “system” would not work after the door slams shut: the door goes down, the contacts open, and the current no longer flows. Even if the rat rushes around inside the trap and steps on the “tricky” plate in the floor again and again, the valve no longer works. I connected all the contacts and the valve in series, so that the design “adequately” responded to the closing and opening processes.
The connection to the network was made as an ordinary electrical cord with an ordinary plug: I “alert” the trap (opened the door all the way and secured it with a “pin”), put the bait behind the movable plate, plugged the cord into the socket - and you can wait for the results of hunting a rodent. I attached a door handle to the top of the rat trap to make it easier to hold the “device” with one hand.
The “running tests of the device” were very successful. I just finished the product and placed it in the corner, between the wall and the refrigerator (both a secluded place and an outlet nearby!). Before I had time to properly prepare myself to wait for the capture of the animal, my uncle showed up to me, already quite cheerful, with “half a liter of tea.” The reason was not subject to discussion: a grandson was born! Well, what to do... I put a snack on the table.
And just as we were about to, as they say, “make things worse,” there was a sharp bang behind the refrigerator. "Here you go! - I thought. - False alarm!" But no! The first fresh specimen was sitting in the activated rat trap! Well-fed! It’s done: my idea has come to life, the device works! Well, we also “sprinkled” this with the guy...
This is the electric mousetrap I made, dear readers. May you not have to do this. And if rats live in your house, then let them be decorative animals - kind and affectionate friends, and not gray, evil, cunning, insidious and dangerous animals! And may your ideas always come true. Good luck to you!
Tags: ideas, electrical appliances, rats, house
DIY electronic mousetrap - diagram, photo, video
Another option for a homemade trap is an electrocution trap. Again, the electronic mousetrap scheme is not classified, it can be used. However, it should be remembered that independent work with electric current can lead to disastrous results. You should follow safety precautions, have basic specialized knowledge and take such experiments seriously.
Remember, your actions can harm yourself and others!
Task: make an unusual electric mousetrap;
Operating principle: a mouse walks and falls into the sensor’s field of action and is electrocuted. After a few seconds, the circuit’s automatic shutdown should work, and until you remove the mouse from the sensor’s field of action, the circuit will not work again.
The converter is built on UC3845, the power transistor is IRF3205, and a 47-volt protective diode is used instead of a snubber circuit (this must be installed, otherwise the circuit may die).
The converter transformer with a gap of about 0.3-0.4mm is wound on a core from some low-power power supply, the primary contains 5 turns of 0.8mm wire, the secondary 300 turns of 0.1mm PETV-2 wire. The voltage from the secondary winding through 3 UF4007 diodes (necessarily ultra-fast 1 kV each), can be HER108, is rectified and charges capacitor C4, then through a 1400V spark gap it goes to the primary transformer which contains 25 turns of 0.8mm wire. The secondary voltage of the transformer is the high-voltage output; it contains 800 turns of 0.16mm PETV wire (preferably PETV-2).
The high voltage transformer is wound on a ferrite core. Insulation was carried out with ordinary A4 files in 3 layers. There are 5 layers between the secondary and primary. Be sure to fill the transformer with epoxy resin, then pump out the air to squeeze out air bubbles, repeat the pumping procedure several times, that is, pump out/gas air.
Above in the diagram we see a simple diagram of a motion sensor. In the normal state, the relay is turned off and +12V goes to the 6800uF capacitor. When the IR light on the photodiode is blocked, the relay is activated and the 6800uF capacitor is discharged into the 7th leg (power supply) of the microcircuit and while it is being discharged, the shocker works, it works for about 3-5 seconds, after which it is discharged and the circuit turns off.
This is such a simple design.
When idle, the circuit consumes about 23 mA, and when the shocker is running, about 5.5-6 Amperes.
We see on the board there are contacts for the explosive output and for 2 diodes, the mouse will first pass through the explosive contacts, then go to a piece of bait, the motion sensor will work and the mouse will literally fry.
I have everything assembled in a canopy, but under the article there will be a board in lay format, designed specifically for the article.
The circuit is powered from a voltage of 12 volts, but it can be from 10-11 volts and higher, 15 volts is also not a problem for it, so you can safely power it from lead batteries (for example, from a machine battery).
Photo and IR diodes can be taken from the TV remote control and the receiver in the same TV.
The transistor in the motion sensor is NPN, in principle you can use any one, up to KT315, but I haven’t tried it, so I won’t say so. The relay is a regular 12 volt one.
Video: Review of electronic mousetrap (45000v)
This diagram is taken here
If you don’t want to do it yourself, you can buy a ready-made device; below, see a brief overview of the most popular models of electronic mousetraps.
Review of Russian manufacturers of electronic mousetraps: victor, sititek antirat, Ecosniper, Yastreb
For those who are far from amateur, a wide selection of patented electronic traps is offered. Let's take the most common ones as an example:
Electronic mousetrap Victor
Powered by batteries, one set is enough to destroy up to a hundred individuals. A special indicator will show that the mouse has been caught and will also indicate that the battery is low;
Video review of the Victor electronic mousetrap
Electronic mousetrap Sititek Antirats
Works both from batteries and from a 220V network. The patented shape of the tunnels prevents a mouse that has climbed inside the trap from getting out;
Video review of the electronic mousetrap Sititek Antirats
Electronic mousetrap Ecosniper
Rodent exterminator Yastreb PP (electric mouse trap)
A universal, compact and reliable device, when a rodent gets into the box, a discharge of 8000-12000 V passes through it - the rodent dies instantly, we recommend this device - ideal price-quality ratio
Add a link to a discussion of the article on the forum
RadioKot >Schemes >Analog circuits >Household appliances >
| Article tags: | Add a tag |
Electronic mousetrap.
Author: Denis Pushkarev Published 09/17/2010
2010
Happy birthday, dear Cat! So I decided to send my diagram. To city dwellers, this may seem like a simple toy, but for those who are familiar with mice first-hand, it can bring some benefit. Mice often appear in cellars, garages, private houses, dachas and similar places, especially in winter. A traditional mousetrap with a spring, in my opinion, is too brutal. And some citizens are trying to fight rodents with poison. But here’s the problem: the mice get drunk, but don’t want to die, and respectable cats are then poisoned by them. So I decided to offer my own version of a mousetrap. It can catch anyone, even rats (and, by the way, not every cat can handle them). Let's look at the diagram:
It is extremely simple. Photodiode any sensing IR range. There were no domestic FDs in the store; they gave me something imported. I don’t remember what it’s called. You can make an electromagnet yourself (those who don’t know how, run to the tutorial). I personally had a ready-made reel. KT3107 provides sensitivity to the photodiode, KT818 is needed because the electromagnet is a relatively powerful load (mine consumes almost half an ampere). Without a resistor, the circuit responded even to simple light. So how does this all work? Yes, it’s very simple: we make a case, preferably a stronger one, put the diodes inside opposite each other, away from the entrance, so that a mouse, or whoever you catch there, can pass between them. There is a magnet with a grill above the entrance. All is ready. Don't forget to put bait. A few words about nutrition: it is best to stabilize the source. When the voltage drops, the IR diode may go out and burn out during a surge. Everything has been tested in action. The stunt mouse was Vanya the hamster. I hasten to assure the Cat that he is absolutely inedible.
The front wall has been removed for clarity. In addition, the hamster did not want to run away if she was there. OK it's all over Now. We put it in the “mouse place” overnight, and by the morning we get a fully functional mouse: It's up to you to decide what to do with it (let your neighbor go out into the snow, give it to the kittens to play with, flush it down the toilet :) Please don't blame me for the installation - it's a trial version. The scheme is also the first thing that I came up with myself from start to finish.
Files:
Video starring Vanya the Hamster.
Questions, as always, in the Forum.
| What do you think of this article? | Did this device work for you? | |
| 22 | 1 | 4 |
| 1 | 0 |