Pros and cons of homemade mousetraps made from plastic bottles
When fighting rodents, it is not necessary to use poisons. A simple solution to the problem would be a trap. The device made from plastic containers is safe for the mice themselves and the people living in the house. If the goal is severe extermination of rodents, the design of the mousetrap is complicated, for example, by supplying electricity.
The designs of most mousetrap models are safe for rodents and people
A homemade bottle mousetrap assembled with your own hands has many advantages:
- When compared with store-bought counterparts, most mousetraps are made with one charge. That is, after catching the mouse, it needs to be recharged. If a person does not live at the dacha permanently, then to exterminate rodents you will have to purchase a lot of such products, and this is already a decent expense. A homemade device will cost free. One plastic container can catch up to a dozen mice.
- Another plus is safety. There is no need for the mandatory use of pesticides. The mousetrap is completely safe for pets and people living in the house. The baits used will not cause allergic reactions.
- A rodent that has penetrated the bait is completely isolated from the environment. The threat of unsanitary conditions is eliminated. If you use pesticides, the mouse does not die immediately, but hides in a secluded place. It is impossible to get it from there. After death, the decomposing body of a rodent will begin to emit a bad odor. In the case of a bottle there is no such problem. Once you catch a mouse, just throw it outside in a trash can or give it to your cat.
Advice!
When there is a threat of a large invasion of mice, it is optimal to make a mousetrap with your own hands from a large plastic bottle. Of the shortcomings, you can find only one point.
If a person has no interest in creating homemade products, his first designs may turn out to be ineffective. It is optimal to make a mousetrap as simple as possible the first time.
DIY mouse traps
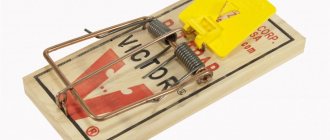
A homemade mouse trap is an excellent solution for those who have children or pets. Store-bought ones may be too expensive. In order to make a trap, they use available materials that can be found in any home. Paper, glass or metal containers, ruler and wire - everything is used.
Interesting! Homemade mousetraps at home can be used several times in a row. There is no need to constantly update and monitor the status of the trap. This is very convenient for people who want to get rid of rodents in their country house.
Mousetrap made from a plastic bottle
One of the easiest ways to make a mousetrap is to use a plastic bottle. Every household has one, but to create a mousetrap it is recommended to use a container with a volume of less than 10 liters. The neck of one and a half to two liter plastic bottles is narrow, so a mouse can climb into it.
Unrefined vegetable oil is poured into it so that it covers the entire inner surface of the container. The cut neck is placed on a stack of books with an inclination of 40 degrees.
Second option
Jar and bucket trap
You can make a mousetrap from a plastic or aluminum can mounted on a rod. At the same time ensuring its free rotation around its axis.
Video:
Jar trap
A homemade mousetrap made from a glass jar resembles a trap made from a plastic bottle. In order to make it, you need to take a three-liter glass bottle and a sheet of paper that will act as a funnel.
The jar is placed vertically, bait is placed on the bottom and a small amount of sunflower oil is poured. In order for the mouse to successfully climb into the jar, you can lean against a wooden ruler (a kind of bridge). The lid of such a trap is made of a sheet of paper secured to the neck with an elastic band with cross cuts.
The principle of operation of a mousetrap is quite simple. The rodent, sensing the smell of bait, makes its way across a wooden bridge onto an improvised lid and falls into the bottle. There is sunflower oil at the bottom, the animal’s paws slide along the walls, preventing it from getting out.
Bucket trap
The most effective trap is a homemade “trap” made from a bucket. The method seems primitive at first glance, but gives good results. To make a trap, you need to take a bucket and fill it with a concentrated salt solution. You need to mask the water with a thick layer of sawdust (fine). Sunflower husks or corn leaves work well. The layer of sawdust should be dense, so that after swelling, they float.
Attention! The bait used to catch the pest must have a special aroma and be located in the center.
Next, make a bridge from available materials (a board or a wooden ruler). Having smelled the aroma of bait, the mouse is unable to resist and goes for easy prey. The rodent ends up on a layer of sawdust and then falls into a concentrated salt solution, with no way to get out.
Glue trap
A do-it-yourself adhesive-based trap can save you a lot of money. You must first purchase a special glue for rodents and thickly lubricate a thick piece of cardboard with it. Bait is placed on the base. Trying to get food, the mouse runs onto the cardboard with glue and sticks with its paws or muzzle.
The animal dies as a result of severe thirst after a few days. The main disadvantage is that it is necessary to throw away the bait along with the dead rodent, which is not very pleasant for particularly impressionable people.
5 Best Glue Traps for Mice and Rats
Wooden
A wooden rodent trap or Zürner rat trap allows you to catch both mice and rats in your country house, private house, barn or barn. The advantage is that such a trap is not designed for one rodent, but can neutralize several pests in one night. You need to spend some time making a Zürner rat trap. First of all, you need to:
- Make a house that resembles a birdhouse with one difference - the hole should be located not in the front, but on both sides.
- The lid of the house should be removable, and the lower part of the box should be lined with tin.
- Opposite the holes inside the house, small planks are attached to form a bridge.
- The boards are equipped with springs that allow them to be maintained in a certain position.
- In the house itself, above the bridges, bait is attached to a thread.
The principle of operation is this: the mouse follows the smell of the bait, looks into the house and makes its way along the bridge. Under the weight of the animal, the board lowers, and the rodent falls down into a box pre-lined with tin. Under the action of a spring, the bridge returns to its place and is ready to receive new visitors.
Important! In addition to the positive aspects, there are a number of disadvantages to this method of catching rodents. Once caught in a mousetrap, the animal remains alive and something needs to be done with it later. In order to make such a mousetrap, you need to spend time. The resulting design is bulky and takes up a lot of space.
Glass jar and coin trap
One of the easiest ways to make a mousetrap is to use a glass jar and a coin. Take a small jar (preferably a liter). Turn it over onto the rim, put a small piece of the selected bait inside, and place a small coin edge-on under it.
Having climbed behind the bait, the animal catches the coin and the trap slams shut. The main disadvantage is that the mouse can touch the coin before it gets to the bait.
Hive
This type of mousetrap looks similar to a bee hive. In order to make a hive mousetrap, you need to take a special wire spring equipped with a ring. The spring is compressed and secured with a thread. Placed in a wooden hive house. The selected bait is also placed there. A mouse that has entered such a mousetrap begins to make its way to the bait and catches the thread with its teeth. When the thread is loosened, the spring sharply opens, firmly fixing the pest and preventing it from getting out.
How to make a mousetrap from a plastic bottle
To assemble a trap, you first need an idea. Finding it will not be difficult on the Internet. You also need materials and tools. You must not forget about the bait, otherwise the rodent will not approach the mousetrap.
Model selection
The bottle is only a container where the caught mouse will stay. However, it needs to be modernized so that the animal does not escape from there.
A mouse can even crawl through the neck of a bottle.
Of the many types of mousetraps, the following types are often used:
- The petal trap is considered the simplest. This can be done in a couple of minutes by cutting the back of the bottle into petals. The downside is unreliability. The mouse is able to escape from the mousetrap.
- The falling trap is considered effective. The rodent will not get out of it. However, after catching one mouse, such a mousetrap will have to be recharged.
- The rocking chair is the most effective, but difficult to manufacture mousetrap. The design has worked flawlessly for many years.
Among other options, you can also pay attention to a mousetrap with oil or an electric model, where the rodent instantly dies from an electric shock when hit.
Advice! Mice are quite cunning and resourceful animals. Don't underestimate their skills at getting out of traps.
Tools and materials
The first material you will need is plastic containers. The volume will depend on what kind of mousetrap design is intended to be made. The most commonly used bottles are 1.5 and 2 liters. You may also need tape and wire. You definitely need bait.
The tools are simple: scissors, marker, stationery knife.
Option #5: Tunnel Trap
The entrance hole of the tunnel rat trap is made in the form of a valve with sharp petals.
The principle of operation of such a device is as follows: Such structures are often used to catch courts, mice and rats in garden plots - in this case, the structure is made from a piece of pipe, at each end of which a valve is installed. The trap is then installed in the underground wormhole.
In the end, it doesn’t matter from which side the mole (or rat) approaches the trap - the animal will still be caught
Here is another example of a trap of this type:
A simple mousetrap from a bottle in a few minutes
For your first experience, just try to make a simple trap. It will take a maximum of 5 minutes. Using a knife, cut off the bottom of a bottle with a capacity of 1-1.5 liters. On the side walls from the cut side, draw triangular teeth with a marker. The length is determined individually, which depends on the diameter of the bottle. The teeth are cut out with scissors and bent inside a plastic container. The sharp ends should almost close together, forming a small hole.
The bottom of the plastic container is cut with teeth
A simple mousetrap made from a plastic bottle, assembled with your own hands, works according to the classic trap method. The bait is placed inside the container. The rodent follows its scent and penetrates the bottle. The teeth concave inwards give him the opportunity to do this, but they will not release him in the opposite direction.
Important! The bottle cap must always be closed.
Why you should make your own mousetrap
The design of homemade mousetraps is so simple that the process of making them is more like creative work. It is not as exciting as sculpture or painting, and it is very difficult to imagine yourself in the place of Rembrandt or Michelangelo. But it’s very easy to become like Kalashnikov or Manerheim.
The most attractive thing about making your own mousetraps is the opportunity to experiment by making improvements to classic designs. Moreover, even if the change did not bring the expected effect, a catastrophe with human casualties will not happen in any case.
A mousetrap is not an airplane or a submarine! Experiments are welcome.
How to make a rocking mousetrap from a plastic bottle
The trap is also called a pendulum due to its triggering method. A rodent that has got inside the bottle tilts it under its own weight, which does not allow it to get back out along the slippery inclined walls.
The materials you will need are a 1.5 liter bottle. It is advisable to find an elongated plastic container with a long neck. The axis on which it will swing is made of aluminum wire. A piece of board is used as a bed.
The axis of the pendulum trap is bent from aluminum wire
The step-by-step instructions for a do-it-yourself bottle mousetrap look like this:
- First, find the location of the axis. The bottle is placed on the table, a pencil is placed under the bottom. Move it until an approximate balance is found.
- On the line of the center of gravity, through holes are pierced through the body of the bottle opposite each other. Insert aluminum wire and bend the support.
- The stand is cut from a board 400 mm long. In the center, under the axis of rotation, you can simply screw in two anchors with a screw thread and a ring. They will act as a support.
- Two bars of equal thickness are attached to the edges of the board. The bottle at the neck has a smaller diameter than near the bottom. Due to the difference in thickness, the plastic container will swing along the axis to a height of 2-3 cm. It will rest on the bars.
- The last step is to place a locking bar on the mousetrap. It is attached to the side of the bottle neck behind the already installed wooden element. The thickness is selected individually. When lowered, the neck should be blocked by a locking bar. When raised, the lower edge of the neck is located at the level of the edge of the bar.
The locking bar should completely cover the neck of the lowered bottle.
A bait weighing 5 g is placed inside the plastic container. The mouse quietly penetrates the mousetrap through the neck along the bar. When moving in the opposite direction, the bottle tilts under the weight of the rodent. The neck is closed by the wall of the locking bar. The rodent is unable to get out no matter how hard it tries.
DIY mousetrap made of wood
This wooden mousetrap can be made with your own hands in just 15-20 minutes, but this model is the most complex. It is possible to install several traps at once, which will be located on one block.
Dimensions will be given for one trap. If you want to increase their number, then simply lengthen the bar several times.
Step 1
A block with a cross-section of 5 x 10 cm is drilled to a depth of 8 cm using a ø25 mm feather drill.
Step 2
Let's call this hole a “mink”. A cut is made along the block, 3-4 mm wide.
Step 3
Three thin holes with a diameter of 2-3 mm are drilled, which should be located perpendicular to the axis of the “mink”. In this case, the first hole is located in the longitudinal cut. The second hole is made approximately in the middle of the length of the “mink”. The third hole is made outside the boundaries of the “mink”.
Step 4
A ring with an eye with a diameter of ≈ 3 cm is made from iron wire. Weave a three-turn spring from elastic steel wire. The free ends of the spring should be 8-10 cm long.
Step 5
Make a three-turn spring from elastic steel wire. The free ends of the spring should be 8-10 cm long. Opposite the eyelet, a strong thread is tied to the ring. For ease of work, thread the free end of the thread into a shoemaker's (gypsy) needle.
Step 6
The thread is sequentially threaded first into the first hole (through the cut). Then from below into the second hole and the free end is fixed with tension by the peg. Please note that the ring should sink into the cut so as not to reduce the clearance of the hole.
Step 7
The spring is inserted at one end into the third hole, and its other end is threaded through the ear of the ring.
Step 8
Several sunflower seeds are poured inside the “mink”. A hand-made wooden mousetrap is ready for use and is in a cocked state.
The principle of its operation is as follows. The mouse crawls into the hole, smelling the smell of seeds. But her way is blocked by a thread that holds the ring tensioned by a spring. The mouse easily chews the thread, and immediately finds itself pressed under the ring.
How to make a mouse trap out of wood using video
Oil bottle mousetrap
Another simple version of the trap can also be made in 5 minutes. However, the design is considered more reliable. Rodents will not get out of it. You will need a bottle of 1.5-2.5 liters. The cork is thrown away; it is not needed. The plastic container is cut off with a knife closer to the neck. The cut is made approximately by dividing the bottle into 2/3. The cut off upper part is turned upside down and inserted into the second. The two parts are fastened together with a stapler or wire.
The entrance funnel of the mousetrap is lubricated with oil.
Bait is poured through the neck into the mousetrap, which consists of seeds, grain, and bread crumbs. The walls of the inverted neck are lubricated with oil. Once in the funnel, the mouse slides along the walls and falls into the sump with the bait. In the opposite direction, the rodent is not able to get out.
Some tricks and features
Simple mousetraps can be made in other ways. The role of the most elementary of them can be played by a glass jar (or a bottle with a wide neck) with bait at the bottom. You can use a bucket or other container, on top of which you place a strong wire, and on it - a ruler with food at the end. When catching rodents, no tricks will be superfluous.
Among other methods, as well as features, the following can be noted:
- A caught rodent can be released, but this must be done away from home, otherwise the pest is likely to return.
- If you decide to fight rodents “to the death,” then when using a system with a bucket, you should pour water into it. To prevent the pest from escaping, do not fill the bucket completely.
- The wire rack above the bucket can be made rotating. This will make the trap reusable.
- The neck of the jar can be sealed with paper cut crosswise: this will make it more difficult for the rodent to escape.
- A jar or cake box can even be used in combination with an elementary support (a twig, a coin). The animal, making its way to the food, will disturb the balance of the structure and end up in a trap. For greater guarantee, the bait can be secured to the wall of the box.
- You can catch a rodent using a champagne bottle with a small amount of oil poured into it.
- The smell of food is important to rodents. Therefore, fried seeds, salted or smoked lard, cheese, bread, nuts, meat, and sausage are good baits. Rice, wheat, and buckwheat are also used.
"Falling" homemade mousetrap from a bottle
The falling trap is single-shot. After catching a rodent, it needs to be recharged. Considering that the bottles are free, you can build several mousetraps.
The essence of the invention is that a small hole is cut near the neck of a plastic container sealed with a stopper, through which a rodent can penetrate to the loaded bait. The bottle is tied by the neck with a rope to a support. Place it on any surface raised above the ground. The edge of the bottle should hang down.
The trap falls from the stand due to the weight of the mouse and bait
Since the mouse tries to get to the bait located at the bottom, due to the overweight, the bottle falls from the stand and hangs on the rope. The person can only eliminate the rodent and reload the trap.
Options for the most successful mousetraps
All of the mousetrap designs below do not require special skills or tools and can be made, as they say, “on the knee” in a few minutes. To build a trap you use:
- Scotch tape and adhesive tape, nylon threads;
- Plastic bottles with a capacity of 2 and 3 liters;
- Scissors or stationery knife;
- Bait.
Advice! A piece of salted lard, fried seeds and a walnut kernel work reliably as bait.
Oddly enough, cheese or sausage are significantly inferior in effectiveness to lard; such bait quickly dries out and loses its attractiveness.
Make an effective bottle mousetrap in 60 seconds
A simple and quite effective mousetrap can be made from an ordinary three-liter plastic bottle. We use a nut kernel as bait. The full course on how to make a mousetrap from a plastic bottle is shown in the video
Initially, you will need to make a mount for the bait from two loops of nylon thread.
Using a utility knife, make a cut on the wall so that you get a petal covering a small window. The window size should be no more than 20 mm. Due to its rounded shape, the petal should easily bend inside the plastic bottle and not deviate outward, preventing the mouse from getting out of the trap.
We pierce the side walls of the bottle on both sides, stretch the thread with the bait and fix the suspension in a taut state using matches and tape.
The place for hanging the bait can be chosen at a height of at least 10-12 cm from the bottom, this is enough for an ordinary mouse, sometimes rodents demonstrate miracles of jumping ability, so the design of the trap can be supplemented with another bottle, which will catch everyone who covets the bait.
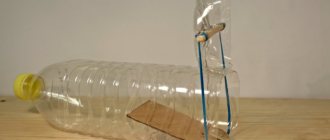
Bucket and bottle mousetrap
The device resembles a kind of attraction. For this work you will need a bottle, preferably in the shape of a regular cylinder. You also need to take a 5-10 liter bucket, a piece of steel wire and a wooden block.
The trap design resembles an attraction with a rotating barrel
Assemble a mousetrap from a plastic bottle and bucket in the following order:
- A through hole is drilled in the center of the plug and the bottom of the plastic container. A steel wire is inserted through the entire bottle. Its length is slightly larger than the diameter of the top of the bucket.
- The bait is attached to the outside of the bottle. It can even be glued or tied with thread.
- The resulting rotating drum with a wire axis is placed on the upper edge of the bucket, into which 2-3 liters of water are first poured.
- A rack is leaned against the edge of the bucket - a kind of ladder for mice.
The drum with the bait should rotate freely on its axis.
A mousetrap loaded with bait from a bucket and a rotating bottle attracts rodents. They climb onto the drum using a slatted ladder. Due to the overweight, the container rotates, the mouse falls into a bucket of water and drowns.
How to make and use a mousetrap
You can, or you can make several devices of different types with your own hands at home to catch nimble rodents.
Traps are either disposable or reusable. The owners will need items that are always at home: a bucket, a plastic bottle, a glass container, bait, plywood. Mousetraps are in no way inferior to factory products; the cost of simple traps is much lower. Adviсe:
- First you need to find the hole from which the nimble rodents come out, and determine the approximate number of mice. Sometimes there are so many pests that they calmly move around the house not only at night, but also during the day, despite the presence of residents;
- for greater efficiency, owners who have experienced the effect of trapping containers recommend installing several devices;
- one more nuance - the bait for mice should have a bright aroma. Good options: makha, fried sunflower seeds, lard, smoked sausage, cheese;
- Don’t despair if rodents bypassed one trap: you’ll have to try another option, fortunately, the cost of homemade devices is minimal.
From a can
How to proceed:
- Wash the liter container and roll it up with a metal lid;
- Carefully cut the surface with a knife from the center, like a cake, slightly bend the sharp teeth down in the central part;
- inside, put a piece of smoked sausage or lard, wheat grains, fresh bread or crispy crackers;
- attracted by the smell of the bait, the mouse will penetrate the jar, but sharp strips of tin will prevent it from getting out.
From a plastic bottle
How to make:
- Wash the container (preferably with a volume of 2 liters, no less), cut off the upper part in the narrowing area (you will get a base and a cone);
- cut off the neck from the smaller part so that a mouse can get into the hole;
- turn the cone over, insert it into the lower part, seal with tape the junction of the plastic elements;
- put bait with a pleasant smell at the bottom of the bottle;
- the gray rodent smells the alluring aroma, makes its way inside through the hole, but does not get back out.
We use a bucket
How to proceed:
- you will need any bucket and a metal rod or a round wooden stick;
- mount a rod into the upper part of the container, first place a plastic bottle or tin can on it;
- the main task is to achieve free rotation of the container if you press lightly on it;
- Place the prepared trap next to the mouse hole, place a bait with a bright smell on the top of a tin or plastic container;
- the mouse smells cheese, lard or sausage, climbs onto the bottle, the container turns over, and the rodent falls down;
- For the operation to be successful, the bottle must be placed closer to the edge of the bucket so that the rodent can easily climb onto it.
Glue traps
The method of catching rodents is quite simple, but effective. The only drawback is the unaesthetic and inhumane nature of the method.
How to proceed:
- buy special glue for rodents, a base for a trap (thick cardboard, plywood, shallow plastic tray);
- Thickly coat the surface with glue and place aromatic bait on the central part;
- On the way to the bait, the rodent will stick to the sticky surface. It will not be possible to remove the pest from the adhesive base. The owners will only have to destroy the mouse and throw away the trap.
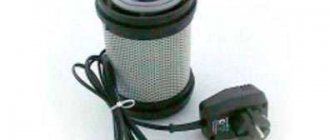
Electric mousetrap from a bottle
The proposed trap option is complex and can be dangerous for domestic animals. The essence of the design is to destroy the rodent with a discharge of electric current.
The materials you need are a piece of galvanized profile used for lathing when installing drywall. The workpiece is cut to a length of 30 cm. The cut neck of a plastic bottle is glued to the outside with a hot gun.
Electrical circuit elements are located inside the profile
For the electrical circuit you will need a 9-volt Krona battery, a Chinese current converter, a small switch from any household appliance and a piece of stranded copper wire. The elements are mounted inside the profile. The wire is connected in series into one circuit, but not yet closed.
The ends of the wire are brought to the contacts of the trap
Unscrew the plug from the neck glued to the profile. Pieces of steel wire are inserted through the drilled holes. These will be contacts. In the initial state they are open. The plug is screwed back on. One of the contacts is made in the shape of a hook. Bait is strung on it, for example, a lard skin or a piece of smoked sausage. Wires of the electrical circuit are connected to the contacts and profile.
To get to the bait, the mouse climbs onto the stand. When a rodent tries to pull the bait, the contacts inside the plug close. Current from the battery is supplied to the converter. Since the mouse simultaneously becomes a voltage conductor between the profile and the contacts, it receives a fatal discharge.
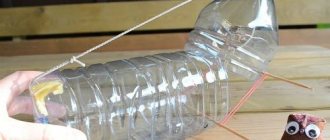
Large mousetrap made from a 5 liter plastic bottle
Another version of a quick-made trap will allow you to get rid of annoying mice. A large plastic container is used, which allows for infrequent recharging. For a mousetrap made from a 5-liter bottle, you will need the container itself. However, first prepare the bait. To do this, the nut is tied to a long nylon thread with loops at the end.
The bait is a nut tied with a nylon thread with loops.
A triangular petal is cut out from the bottle closer to the bottom. It should bend easily into the container, but jam in the opposite direction. The window size is about 2 cm.
The petal should bend inward, but jam in the opposite direction
At a height from the bottom of the bottle, through holes are pierced in the walls. A thread with a nut is threaded through them. At such a height, not every mouse will reach the bait, but it will also not get out of the bottle due to the closed petal.
Details
What you need to know before making a mousetrap from a bottle
At the very beginning, keep in mind that you should not count on the full effectiveness of the mouse trap; even the most successful and effective mouse trap at first glance can fail, and therefore it will be useful to observe how the mouse falls into the trap, and most importantly, how it tries to get out of it. Such observations may come in handy when the time comes to make a new and more improved mousetrap. When planning a mousetrap structure, the following 3 circumstances must be taken into account:
The PET bottles from which the traps are made must be changed at least once a month.- In no case should toxic substances or poisons be used in mouse traps.
- The labor intensity of creating a mousetrap from a PET bottle should be small, otherwise such an activity will quickly get boring.
A mouse has the ability to capture the most subtle aromas, and if about 10 mice are caught in a mousetrap, then aromas with “signals” of panic will always remain on the PET bottle. These mousetraps need to be thrown away without sadness, and a brand new trap can be made to replace the old one. The material of the PET bottle does not represent a particular barrier for the rodent, and therefore it is important not only to catch it, but also to get the mouse out of the trap in time, before the animal simply gnaws the hole and runs away, taking the bait.
Options for the most successful mousetraps
The designs below do not require any special skills or tools, and they can be done, as they say, “on the knee” in a couple of minutes. To create a mousetrap from a plastic bottle, use:
- Bait.
- Stationery knife or scissors.
- PET bottles with a capacity of 2 and 3 liters.
- Adhesive tape and tape, nylon threads.
Helpful advice! A piece of salted lard, fried seeds and a walnut kernel work reliably as bait.
No matter how strange it may be, sausage or cheese is much less effective than lard, and this bait quickly dries out and loses its beauty. A simple and very effective mousetrap can be made from a simple three-liter plastic bottle. Use a nut kernel as bait, and the full process of how to make a mousetrap from a PET bottle is given in the video. Initially, you will need to make a mount for the bait from a pair of loops of nylon thread. Using a stationery knife, you need to make a cut on the surface of the wall so that you get a petal that covers a small window. The dimensions of the “window” should be no more than 2 cm, and thanks to its rounded shape, the petal should easily bend inward into the plastic bottle and not deviate outward, preventing the rodent from getting out of the trap.
Pierce the side walls of the bottles on both sides, stretch the thread with the bait and fix the suspension in a taut state with tape and matches. The place where the bait will be suspended can be chosen at a height of no more than 12 cm from the bottom element, and this is enough for a simple mouse, and sometimes rodents show miracles of jumping ability, and for this reason, the design of the trap can be supplemented with another bottle, which will catch everything, who will covet a piece of delicious food left behind?
The simplest types of mousetraps
The simplest version of a mousetrap made from a PET bottle is shown in the video. You can create a simple device with your own hands in a couple of minutes. You just need to cut off the neck, and cut the edge of the remaining container using scissors into jagged teeth shaped like a triangle with a length of 3 to 3.5 cm. The jagged edges will bend inside the bottle, and the bait will be placed on the trap bottom. As planned by the manufacturers, the mouse will fall inside the mousetrap, but it will not be possible to get out of it due to the teeth. A more effective type of mousetrap would be one that can be made from a plastic container according to the diagram presented below. You need to cut off the top part of the bottle, turn it over, remove the cap and mount it back into the cut element. This will result in a design that strongly resembles the USSR non-spill inkwell in design.
It is recommended to treat the internal mousetrap part with sunflower oil, and installing the upper part of the trap must be secured with a stapler. An excellent falling-type mousetrap can be made from a simple plastic bottle with a cut-out window in the neck area. Place bait (lard, nuts) on the bottom of the bottle, tie the trap itself with a cord around the neck and place it on the table. In order for the mousetrap to work, it is placed on the edge so that part of the bottom with the bait is behind the edge of the tabletop. A mouse entering the bottle will ruin the balancing, and this will cause the container to tip over and hang on the cord. It is very difficult to get out of the mouse container. You need to remove it from the trap in time, before the cat throws it off with the trap.
How to make a rocking mousetrap
The best trap for a mouse can be made using the principle of a pendulum or swing. The principle of operation of such a mousetrap is in many ways similar to the previous version of the trap, but the only difference is that the bottle will not tip over from the table, but will tilt under the weight of the rodent, blocking the exit from the trap. A typical design is shown in the photo. The principle of operation can be seen in more detail in the video. In order to make a mousetrap from a plastic bottle with your own hands with a capacity of 1.5 liters, preferably with a narrow and long neck.
Since the device must swing freely under the weight of the animal, it is necessary to determine in advance the line on which the center of gravity will be located. To do this, you need to place a simple faceted pencil on the table, and also a container on it. Moving the bottle left and right, find the equilibrium position, and also mark the line with a marker. As planned, the bottle should swing on an axis of rotation, and a piece of flat steel wire or a bicycle spoke can be used as it. On the balance line, mark the midpoint and use an awl to punch a couple of holes through which the axis of rotation will pass.
A plastic container with a steel axis needs to be installed on a stand, and for this you can use a small piece of board with a length of 0.4 meters. Nail a couple of wooden blocks of the same size to the board, on which the axis of rotation will rest. When swinging, the neck of the bottle should lower and rise at least 0.2-0.3 meters. All that remains is to make and install the locking block. Its height must be chosen such that, in a raised position, the lower edge of the plug hole is flush with the upper edge of the wooden block. So, the mouse can easily climb up the bar into the trap, and under the weight of the mouse the bottle will turn and close the entrance to the PET container. Naturally, the mass of the bait should be 2 times less than the weight of the mouse, ideally from 3 to 5 grams, no more.
Trap made from a bucket and a plastic bottle
The oldest and also proven design for catching mice can be made from a bottle with a capacity of 0.5 liters, a galvanized bucket and wire. First you need to drill a hole in the bottom and cap of the bottle that is equal to the diameter of the wire. The latter will play the role of an axis for rotation, and therefore the plastic container should rotate effortlessly and freely.
The length of the wire is chosen 6 cm longer than the diameter of the bucket. For a bottle that is attached to a wire, additionally put on a tin lid, which is used for preservation. Tie a bait on the side of the bottle to the lid and install the entire structure on the bucket.
You can attach a wooden plank or plank to it to make it easier for the animals to rise to the top. If there are a lot of rodents in the basement or garage, then the inside of the bucket needs to be wiped with oil or filled with water to create a surface so that it is as slippery as possible. Up to 10 mice can fall into the trap during the night, and then you will need to take measures to prevent the animals from escaping from the trap.
The device works very simply, and the mouse, trying to get to the bait, will come out onto the rotating bottle and fall down. The slippery surface of the plastic makes it almost impossible to get a grip. Unlike other designs, such a mousetrap can be left overnight without fear that rodents will damage the trap or be able to escape from it. Instead of a bottle, you can use any object with a smooth surface and a large diameter. You can mount a ruler, a piece of polypropylene water pipe, and even a piece of glass. Wood and untreated metal will perform even worse.
Features of application
Homemade mousetraps cannot be called 100% effective. Any design can fail. The trap can be placed in a place where it is convenient to observe it from afar. This will make it possible to evaluate performance, find defects and eliminate them.
You can watch the trap in action from cover to find out its weak points.
There are three requirements for plastic mousetraps:
- It is advisable to replace plastic bottles once a month;
- pesticides cannot be used instead of bait;
- The design of the mousetrap should be simple so that it can be easily replaced with a new one.
Even multi-charged mousetraps need to be emptied more often. Trapped rodents send a panic signal. Other individuals may not go into the trap.
How to catch a mouse
It's easier to fight a pest when you know what it is.
Table: distinctive features of mice
A medium-sized animal can easily slip into a round slot with a diameter of about a centimeter and, in an extreme situation, jump up to one meter in length.
The fight against domestic rodents includes the use of spring mousetraps, glue traps, various types of repellers, and poisoned baits. At the same time, people have to change tactics all the time, inventing new devices. Live traps are the most humane means of getting rid of rodents and they are quite easy to make with your own hands from scrap materials.
Humane plastic bottle mouse trap
To make such a trap you will need a plastic bottle, rope, a heavy object and bait. The rope must be tied to the neck.
The rope must be of sufficient length
We put bait in the bottle. Mice are most attracted to foods with a strong aroma, but smelly chemical additives likely won't work.
It is better to use natural products as bait
The bottle should be placed on the edge of a table or other surface. We fix the end of the rope using a heavy object.
Homemade mouse live trap installed and ready to go
Live trap from a jar with a coin
Making this mousetrap requires an empty glass jar, a coin and bait. Installation takes literally a few seconds.
A trap made from a jar with a coin is the simplest, but very effective way to catch small rodents
Attach the bait to the inside wall of the jar. Set up the trap as shown in the photo below.
This live trap may require concentration when setting up
Catching pests with a bucket and ruler
You can catch a boring mouse using a plastic bucket. To prevent the rodent from jumping out of the container, apply a little vegetable oil to the bottom and walls.
Any sufficiently deep plastic bucket is suitable for catching mice.
Popular articles Palm tree made from plastic bottles
The next step is to install a ruler with bait on the edge of the table
It is important to properly balance the mechanism here.
Place the bucket exactly in the center of the bait and go about your business with peace of mind. The caught rodent will not be harmed.
Live trap using a bucket and ruler installed and configured
Mousetrap made from a can and thick paper
To make the next trap you need a glass jar, a sheet of thick paper, a rope, a knife and a piece of something tasty.
Cheese, of course, will do, but mice don’t like it too much, oddly enough.
Place cheese in a container, cover with paper and twist with a rope in the same way as jars of jam are sealed.
It is advisable to tighten the neck of the container more tightly
Using a knife, cut the top of the paper into a cross. The corners should be recessed a little deeper.
Using a sharp knife, cut the paper into a cross
Place the trap in an area where pests are most active. Don't forget to check it from time to time.
Live traps should be checked more often, as a caught pest can escape with some effort.
Another live trap made from a plastic bottle
Take an empty plastic bottle. Cut it lengthwise with a knife by about a third of the total length. Be careful, the plastic may slip on the surface.
When working with a knife, be careful not to cut yourself
Turn the cut part over and secure it with clothespins, paper clips or, for example, hair clips.
The process of making such a live trap will not require much time.
All that remains is to put goodies in the live trap, place it in places where mice are active and provide easy access.
So that the mice can gain access to the free cheese, we will use the ruler again
Spiny mousetrap
To make a trap, you will need the bottom of a plastic bottle cut in half and a knife (or scissors).
The lower half of the plastic container is a live trap blank
Next, being careful, you need to cut out pointed elements with a length approximately equal to half the diameter of the container. The step width of each element does not play a big role. All that remains is to put a fragrant piece of banana in the product to attract pests, bend the cutouts inward and wish yourself a successful hunt
The mousetrap should be installed in areas of increased rodent activity, so the chances of success increase significantly
All that remains is to put a fragrant piece of banana in the product to attract pests, bend the cutouts inward and wish yourself a successful hunt.
The mousetrap should be installed in areas of increased rodent activity, so the chances of success increase significantly