How it works
The rat and mouse repeller emits sounds at high frequencies that are not perceived by people, but rodents feel ultrasonic waves.
The purpose of the device is to create sound vibrations with frequencies and power that are perceived by rats and mice (frequencies from 30 to 70 kHz).
Most repellers emit only ultrasonic waves, but there are also those that also produce electromagnetic radiation.
Ultrasound devices can only act on the area of a single room, since ultrasonic waves do not pass through walls or floors. Electromagnetic radiation penetrates walls and is blocked by metal plates and objects.
Ultrasound, reaching any surface, is reflected from it. From this we can conclude that one ultrasonic repeller for several rooms in the house will not be enough. There are a large number of such devices on sale, but they are not cheap, so it is more economical to assemble such a device yourself.
Typhoon
Typhoon is not one device against rodents, but a whole series of devices, each of which has certain parameters. All these devices can be purchased not only for apartments and private houses, but also for industrial buildings.
The price of a repeller depends on the area of propagation of the waves emitted by the device. The price for Typhoon 800 starts from 1600 rubles. This electrical appliance has the following characteristics:
- Can be used in rooms up to 220 meters.
- It has a surface mount with which it can be attached to walls.
- Works both from the network and from a car battery.
- The sound, which is dangerous for rats, is emitted in a wide beam, which increases the efficiency of the device.
- Typhoon operates in two modes. It is recommended to turn on silent when used in rooms where people live. The sound mode has more power, but it is used in warehouses, basements, and garages.
- The price of the device depends on its power. If you need a rat repeller for a small room, then you need to purchase Typhoon 600.
The Typhoon device is quite easy to use; after assembly, all you have to do is connect it to the network. After turning on, the device emits a sharp signal for about two seconds, then goes into wave generation mode.
When switching on in unheated rooms, it is necessary to focus on the temperature conditions of operation. Rats begin to leave the premises after about four days.
A design feature of the Typhoon is considered to be the presence of a microprocessor that constantly changes the duration and frequency of sound waves and thereby prevents rodents from getting used to them.
Essence of devices
The ability of ultrasound to affect many animals has long been known. A number of devices that are offered by well-known companies are based on this principle. It should be noted that they have proven their effectiveness in such a rather difficult problem as scaring away harmful rodents from human homes. The circuits of a proprietary ultrasonic repeller are complex, and not even every professional can replicate them at home. In this regard, many people have a question about how to make a simple device for rats and mice with their own hands.
In general, a homemade rat and other rodent repeller is a simple electronic device. The main task is the emission of a high-frequency sound signal, which is not perceived by human hearing and domestic animals, but affects rodents. This condition is ensured by an ultrasonic wave with a frequency in the range of 30-70 kHz. At the same time, the device will be able to scare away rats if the emitter power is sufficient. Thus, modern devices contain sources with a power of up to 100 dB. Naturally, as the power of sound vibrations increases, the effectiveness of the mouse and rat repeller increases.
Making a mouse repeller body
It is convenient to make the device based on a cylindrical metal can of coffee, animal food, etc. Repeller assembly procedure:
Advice. It is best to place the printed circuit board in a plastic bag. At the point where the wires exit, tie it with thread.
Instead of a telephone capsule, you can use a purchased piezo emitter. The principle of assembling the repeller in this case will remain unchanged. Only the ultrasonic wave generator will require additional insulation. The can will add additional distortion to the radiation, so the sound of the repeller will seem even more disgusting to rodents and moles. In fact, the metal itself will vibrate, receiving an impulse from the emitter.
Close the jar with a lid. Then bury it in the chosen location. The depth is approximately half the height so that water does not get under the repeller cover. It is far from ideal in terms of tightness.
Be prepared that you won’t be able to eliminate the pests right away. Time must pass - up to 2 months. If you plan to place the repeller indoors, make it more powerful. Walls and other obstacles will reduce effectiveness when the sound is low.
Other pets may also react negatively to the waves. In this case, adjust the frequency. Experiment with this at the stage of assembling the repeller circuit.
Simple device
A very simple repeller diagram is shown in Fig. 1.
Fig.1. Scheme of a simple repeller
A piezo emitter (BQ1) is used as a source of ultrasonic vibrations. In principle, you can use this part of any brand. In particular, the emitters ZP-1, ZP-18, ZP-25 perform well. The frequency circuit that provides the required parameters is formed by transistors (VT1-VT2) together with resistors and capacitors. You can use transistors of the brands KT361B, 2T3307A, 2T3307V, KT3107, etc.
Resistors (R1-R5) ensure that the desired operating mode of the transistors is set and limit the current and reduce the voltage.
It is recommended to use 0.25 W output resistors.
Variable resistance (R6) provides frequency control at the output of the device. Standard output ceramic capacitors are used as loop capacitors (C1-C2). The power source for the circuit can be any power supply (battery, accumulator) with a voltage of 2-12 V. Increasing the supply voltage increases the power of the emitter, i.e. and device efficiency. Protection of the circuit against incorrect supply of electrical power is guaranteed by a diode (VD1). You can use a diode like KD503A.
Electrical circuit and operating principle
The rodent (mole) repeller is assembled according to the electrical circuit diagram below and consists of only two simple logic chips, a transistor and several passive elements located on a printed circuit board. A distinctive feature of the proposed circuit is low power consumption (a set of three AA finger elements with a capacity of 1 A*h is enough for the entire season), which is due to the emission of an audio signal with a frequency of about 480 Hz for two seconds with a frequency of once every 32 seconds. In addition, this mode of operation of the repeller has a more effective effect on moles and increases the time it takes rodents to get used to the sound.
Structurally, the circuit consists of a clock generator assembled on elements DD1.1 and DD1.2 generating a frequency of about 480 Hz, a frequency divider on the DD2 chip, a logical signal adder on DD1.3, a key transistor VT1 and an audio emitter BA1.
The frequency of the rodent repeller clock generator is determined by the values of resistance R1 and capacitor C1. By decreasing or increasing the value of R1 or C1, you can accordingly increase or decrease the frequency of the emitted sound signal.
From the generator, a rectangular sound signal without changing frequency, through logic element DD1.3 and current-limiting resistor R4, is supplied to transistor VT1, turned on in key mode. In silent mode, a voltage close to zero is applied to the base of the transistor and the transistor is closed. In this mode, the current consumption of the rodent repeller is 0.1 mA. In the sound signal emission mode, the current increases to 22 mA. A simple calculation shows that when using batteries with a capacity of 1 Ah, the mole repeller will work for 9000 hours or 375 days.
The signal from the clock generator is also sent to the counting input (pin 10) of the frequency divider DD2. Based on a positive signal drop at pin 9 of the counter, logical zero changes to logical one. In order to ensure the emission of an audio signal with a period of 32 seconds, a logical unit is supplied from pins 15, 1, 2 and 3 through diodes to the 12 pin of logic element DD1.3, locking it. As soon as a logical zero appears simultaneously at pins 15, 1, 2 and 3 of DD2, DD1.3 will pass a signal from the clock generator to the base of transistor VT1 and BA1 will begin to emit sound.
The chain C2 and R2 is used to set the output voltages of the DD2 chip to zero. When supply voltage is applied to the circuit, capacitor C2 begins to charge and a supply voltage appears at its lower terminal, which is supplied to pin R of the microcircuit. When the charging process is completed, the voltage at its lower terminal will drop to zero and will no longer affect the operation of the DD2 chip. Resistor R3 is a load for diodes VD1-VD4, so that there is somewhere for the current to flow and to eliminate interference in the absence of voltage at pin 12 of the DD1.3 microcircuit. C3 is used to suppress interference that occurs during transient processes in microcircuits
Add a link to a discussion of the article on the forum
RadioKot >Schemes >Digital devices >Household appliances >
| Article tags: | Add a tag |
Rodent repeller with thermostat (OGT)
Author: sathv, Published 08/29/2016 Created using KotoEd. Participant of the Competition “Congratulate the Cat as a Human 2021!”
Description of a rodent repeller with a thermostat - OGT.
Autumn is approaching and our Murka has the difficult task of protecting home bins from attacks by mice, moles and rats (hereinafter referred to as rodents). To help her and free up time for licking her fur, a repeller based on a microcontroller was developed, and to load it, a thermostat was added to heat the room in cold weather.
Last year, a factory repeller was purchased, which showed good results, but since protection against rodents must be in all directions and levels, several more such devices are needed. The factory repeller is somewhat expensive, but the Internet offers two or three repeller schemes that emit packs of ultrasonic pulses with varying frequency and duration. But they are made on logical chips and do not give scope for amateur radio thought. . . Therefore, the task was set to create a device that would annoy rodents with a cacophony limited only by the imagination of each manufacturer, consisting of cheap, or even better, used parts.
To obtain ultrasound, you can generally use rectangular pulses at the output of the controller port - anyway, the emitter has a limited bandwidth and sound waves will be created only by the first (and second) harmonics of the meander. But it was decided to take, as always, a more difficult path and use the PIC16F84A04 controller to obtain a sinusoid with the ability to programmatically change the frequency and amplitude to enhance the impact on the rodent through a sound attack. Quite expectedly, this led to a complete fiasco: the frequency of the created signal did not exceed a kilohertz, or the software tuning range was less than one octave. Therefore, we had to start generating a triangular signal, which, after passing through a diode limiter, becomes quasi-sinusoidal, as in the circuits of simple low-frequency generators on an operational amplifier.
The circuit for generating a triangular signal is shown in Fig. 1
The signal is taken from capacitor C5, one terminal connected to the “midpoint” +2.5V formed by resistors R1, R2 and capacitors C1, C2, and the other to the controller ports RB1 – RB7 paralleled through resistors R5 – R10. Then the current flowing through C5 from the port in state “1” is positive, and from the port in state “0” is negative. By changing the number written into port B (that is, the currents flowing through resistors R5 - R10), we change the magnitude of the current, and since dU/dt = I/C, then by changing the magnitude of the current we change the steepness of the triangular signal or, which is the same thing - its amplitude (in the program - the DL variable). The duration of the voltage increase (decrease) is set by the controller, switching the direction of the current with the COMF portb command, after the half-cycle of the signal has expired (in the program - the OT variable). By setting the appropriate pairs of values for the variables DL and OT, you can obtain a triangular signal of the required amplitude and frequency within one octave (see Fig. 2). If it is necessary to expand the frequency range to several octaves, you can switch some of the B ports to receive mode to reduce the current through C5. To change the amplitude, it is necessary to change the DL parameter - apparently, due to the quadratic frequency response at microcurrents of the order of 0.1 mA, the diode limiter can turn a triangle into a quasi-sinusoid when the level changes by 10-15 dB.
Thus, using a procedure of 15-20 commands, a triangular voltage with stepwise adjustable frequency and amplitude can be obtained on C5. The frequency of this voltage will be limited to approximately 100 KHz (1/(0.5 µs x 20)) for a controller with a clock frequency of 8 MHz. With some effort, you can obtain a periodic voltage of a different shape - for example, a piecewise linear approximation of a sinusoid or a bell-shaped pulse (at the request of rodents).
Of course, this is only true if the signal amplitude at capacitor UC5 is much less than 2.5 V. Otherwise, the triangle will be greatly distorted and there will be no quasi-sinusoid
similar to its prototype. Approximate calculations and measurements have shown that it can be assumed that the harmonic distortion of the output signal will not exceed
100 x (UC5/5)%. That is, for a Kg sine wave of 5% UC5 should be no more than 0.25 volts.
For a measuring generator, 5% is an unacceptable value, but for a probe or just a sound source it is quite suitable. Figures 3 and 4 show the resulting quasi-sinusoid.
The flat parts of the triangles are “reverse squared”, the vertices are cut off by the divider VD1,2 and R3, R4 “rounds” the vertices, increasing the forward resistance of the diodes, capacitor C4 suppresses pulse surges above 30-50 KHz. In accordance with the small UC5, the limiter uses 1N5819 Schottky diodes with a forward voltage of 0.3-0.2 V. Through C3, the sine wave is supplied to the ULF with a sufficiently high input impedance (so as not to overload the sine wave driver), where the signal is amplified to a power of 1-2 Tue
Figure 5 shows the sequence of pulses generated by the controller.
Pulse packets occur at intervals of two seconds and have one of 7 durations from 2 to 15 seconds. Each packet is filled with a sine wave of one of the eight frequencies shown in Fig. 2. For some reason, the procedure for obtaining pseudo-random values of duration and frequency in the design did not work, although it worked in PROTEUS. A model of the digital part of the circuit in PROTEUS is included in the appendix and, in my opinion, gives an idea of the formation of a triangle signal and the use of menus.
There are no great requirements for the storage thermostat; it is possible to select five temperature values using the menu with low stabilization accuracy, since the temperature is determined by measuring the charging time of the “thermal resistance-capacitance” circuit connected to port RA4. A 200 ohm resistor and a zener diode provide additional protection for the port. The temperature is selected by pressing a button in the ring menu.
| Temperature, С0 | LED 1 | Light-emitting diode 2 | LED 3 | Button |
| 2 | off | off | off | Single press |
| 5 | on | off | off | Single press |
| 7 | off | on | off | Single press |
| 10 | off | off | on | Single press |
| 35 | on | on | on | Single press |
| 35 | Single press to go to +2deg |
The stabilization temperature is determined by the variable GR, which can be selected according to the graph in Fig. 6
The resulting CDP diagram is shown in Fig. 7
The OGT is assembled from several boards - the power supply and ULF are taken from an old active speaker, a 13.5V/5V converter on MC34063 is added there to power the controller, a separate panel with LEDs and a button, a breadboard with a controller, a triac on a small radiator with terminals . The boards are fixed on a plastic base and placed in the HF/MF speaker from the speaker system.
All this is shown together in Fig. 8.
The emitter is a 2GD36 or YDT5090-10 speaker with a frequency range of up to 20 KHz; The speaker is connected through a small capacitor to reduce the volume of low-frequency clicks that occur due to TMR0 overflow interrupts, which slow down the generator procedure. They are not eliminated because continuous generation is not required and also enrich the sound.
And about the features of temperature measurement. . .
The thermal resistance is placed in a multivitamin jar with the bottom cut off. Small copper “wings” are soldered to the thermal resistor terminals (as close as possible to its body) to improve heat transfer and, accordingly, more correctly measure the ambient temperature. If you need to control the temperature of an object - a shelf or a bucket with something, a lid with massive heat-conducting washers is screwed onto a jar with thermal resistance, which should touch the object of interest to us.
CAREFULLY! When using ODT, it should be taken into account that the ultrasonic radiation it creates has a negative effect on people and animals, even in the absence of unpleasant sensations. Therefore, it should be used in areas inaccessible to accidental entry. I would like to hope that the OGT will not harm the health of even rodents, since the developer does not hate them.
The description is accompanied by a diagram in spl format, a folder with a project in MPLAB and a project of the digital part of the diagram in PROTEUS.
Files:
Project PROTEUS Project MPLAB Schematic in SPLAN
All questions in the Forum.
| What do you think of this article? | Did this device work for you? | |
| 18 | 8 | 14 |
Advantages of the device
Repelling mice with ultrasound has a number of advantages:
- no need to search for and remove the carcasses of dead rodents;
- there is no danger of poisoning pets with poisons;
- safe for people;
- works throughout the room, no need to update baits.
The electronic device repels not only rats and mice, but also many insects. In parallel with rodents, you can remove ants, cockroaches, and spiders from the house.
A properly assembled homemade ultrasonic mouse repeller works no worse than a factory one, but has its drawbacks. A more effective option is a combined version of the device that generates both ultrasonic and electromagnetic waves.
Advantages over other electrical appliances
The electromagnetic repeller is environmentally friendly and harmless, has a compact size and low power consumption. The emitter can operate at any temperature and any air humidity. It does not contain harmful chemicals and is able to work continuously until pests are completely eliminated from your home, apartment, or office. The innovative device operates absolutely silently. Unlike ultrasonic emitters, which repel mice with high-frequency sounds, electromagnetic devices operate throughout the entire perimeter of the house. The fact is that ultrasonic waves are not able to penetrate walls and furniture, which is why such devices operate only in the room where they are turned on.
Electromagnetic repellers have a large coverage area and work unhindered. This action is due to the fact that electromagnetic waves freely penetrate walls, furniture and other obstacles, due to which they are able to scare away rodents even from hard-to-reach and hidden places. Therefore, if you drive rats and mice out of their holes and nests, they will leave their homes en masse and for a long time.
The electromagnetic mouse repeller is absolutely harmless to people and pets, but dangerous to all rodents without exception. Therefore, before connecting the device to the network, it is necessary to remove all domestic rodents from the house: hamsters, guinea pigs, etc. In addition to furry pests, the device also affects other domestic parasites in the form of insects: ants, bedbugs and spiders.
The area of action of the electromagnetic emitter against mice reaches 130 m². But this is only for enclosed spaces with a closed electrical network. Such repellers are absolutely ineffective when used in open spaces where there is no electrical wiring, or in very large rooms. Therefore, it is better to use high-power ultrasonic repellers in warehouses and production workshops.
The effectiveness of an ultrasonic repeller
When dealing with pests yourself, there are a few things to keep in mind. No matter what method you use, physical, chemical or electronic, you must remember to avoid any pests or rodents at all costs. They can be dangerous as some of them are poisonous. Additionally, if they feel threatened, they may bite. Rats, mice and bats sometimes carry diseases, and close contact with them can spread the disease. If you use chemicals and the like to get rid of pests, remember that if they are deadly to animals, then in all likelihood they are also dangerous to you.
Rodents are not only pests, but can also be dangerous to humans
Among the three methods, the safest pest control method you can do is a DIY electronic mouse and rat repeller. All that is required is a simple device that can be connected to electricity and it will work immediately.
Rat and mouse repeller effective methods of control
Gardeners who live in summer cottages in the autumn know how much trouble and trouble mice sometimes bring, and even worse, rats. These pests can destroy your supplies, vegetables and grains. Making their way into the smallest cracks, pests bring food, things and other rubbish there, form their own lair and damage property. Today there are several ways to combat mice and rats:
- Repellers that create conditions for rodents in which the latter cannot exist.
- Mouse - and rat traps.
- Chemicals designed to poison rodents.
The most modern method of controlling rodents is considered to be repellers, of which there are a great many models. To make the right choice, you should first understand the types of repellers that are presented in specialized stores:
Ultrasonic. Quite an effective device, the whole essence of its work is to reproduce ultrasonic waves, which have a detrimental effect on rodents. Mice and rats run away from such sounds and are very reluctant to come back.
Advantages:
— safety for humans,
— humanity (does not destroy, but repels pests),
- affects not only insects, but also rodents.
Flaws:
— the sound of the repeller is limited to the walls of the room in which it is located; in other rooms there will be no effect from its operation,
- reducing the level of impact of the repeller in rooms cluttered with furniture.
Electronic. An electronic repeller also emits waves that are perceived by rodents and repel them. Its only difference from the previous type is the small area that the waves of such a repeller can cover.
Electromagnetic. This type of repeller works through the use of electromagnetic radiation. Some models in combination also use other types of radiation: ion and ultrasonic. This repeller perfectly repels not only rats and mice, but also ants, cockroaches and some other pests with powerful electromagnetic waves.
The principle of operation of an electromagnetic repeller is the use of low frequency waves that affect the nervous system of pests. After which they leave such a room. In models with combined exposure, ultrasound waves often change, so rodents cannot adapt and survive such exposure. And ionic radiation helps remove odors from the room that attract pests.
In order to choose a truly effective device, you should consider some points:
- Some types of radiation do not penetrate well through obstacles (for example, room walls), so you need to buy either several models or devices that are capable of strong radiation (electromagnetic).
- If there is carpet on the floor, the effect of using an ultrasonic repeller will be small, but wallpaper or a stretch ceiling perfectly reflects the waves and helps them spread throughout the room.
- It is important to consider people's actual experiences before purchasing any type of repeller.
- It is worth paying attention to the area indicated in the accompanying documents, in which the repeller will operate most effectively,
Important! Domestic devices often make a little noise and have a negative impact on pets, but imported devices do not have this problem. .
Now you can choose a rat and mouse repeller: which one is better or which is cheaper – it’s up to you. Buying a truly high-quality and effective repeller is not so difficult; it is important to take into account all the necessary points when choosing and installing it, and the problem of rodents will no longer be relevant.
See also video:
Ultrasonic mouse repeller. Reviews
https://youtube.com/watch?v=7OSQI829dpU%3Ffeature%3Doembed
What do you need
There is no need to spend money on factory-made devices, since it is quite possible to make a mouse and rat repeller yourself. You can make the device using a ne555 or ne556n timer. Microchips will produce a signal that will repel rodents. To assemble an ultrasonic device, you will need the following parts:
- resistors R1, R2 (for adjusting the ultrasound output level) – 2 pcs.;
- resistors R3, R4, R5 (to reduce the voltage in the electrical network) - 1 pc. each;
- capacitors C1, C2, C3 (for forming a frequency circuit) - 1 pc. each;
- transistors of the GT404, KT361 and GT402 brands (for forming a frequency circuit) – 1 pc. each;
- diode – to protect the device in case of incorrect connection to the network;
- piezo emitter – for producing an ultrasonic signal;
- speaker;
- battery;
- toggle switch to turn the device on and off.
What parts to use
The device can be assembled using a ne555 or ne556n timer.
Microchips P416 and KT315 will make the signal, which is responsible for repelling rodents and insects from the house, stronger. Before you begin assembly, you need to acquire the necessary parts:
- capacitors C1, C2, C3 - one piece each;
- resistors R1 and R2 – 2 pcs.;
- resistors R3, R4, R5 – 1 pc.;
- transistors KT361, GT404, GT402 – 1 pc.;
- 5 V battery – 1 pc.;
- dynamic head – 1 pc.
Parts can be removed from unnecessary or old electronic boards or you can look for components of the microcircuit on the market.
Variable resistors (R1 and R2) help set the output level of ultrasonic waves. Simple resistors (R3, R4, R5) reduce the voltage in the electrical networks.
Capacitors and transistors allow you to make a frequency circuit. DIY repeller You will also need the following components:
- diode - will protect the device if it is incorrectly connected to the network;
- piezo emitter – produces an ultrasonic signal;
- toggle switch – turns the device on and off.
You will need to buy a soldering iron. Without it, the rat and mouse repeller circuit will remain unassembled.
Instead of a BA1 telephone capsule of the TK-67-NT type, you can use similar capsules of the TA-56M, TA-56, TON-2 or TG-7 type with a winding resistance of about 60 Ohms. Diodes, capacitors and resistors are suitable for any type.
Diodes, capacitors and resistors are suitable for any type. Any npn transistor is suitable, but it is better with a minimum voltage drop between the collector and emitter. In this case, the emitted power of the sound signal will be greater without increasing the current consumption of the mole repeller.
The D1 chip of type K561LE5 can be replaced with a foreign analogue CD4001A, and type K561IE16 with a CD4020B chip.
Assembly Rules
DIY ultrasonic rat and mouse repeller
The rat and mouse repeller circuit is drawn up on PCB. In the absence of one, everything is connected by wires. Separate wires are routed to the battery and speaker. The sequence of assembling the repeller circuit is as follows.
- Checking the drawing.
- Stripping wires, treating them with tin and rosin.
- Sequential soldering of parts.
- Connecting the power supply.
- Testing.
- The homemade device is placed in a suitable housing or box, in which holes are made in the speaker area.
You should not expect instant results from the device. The effect will be noticeable after 2-3 weeks of continuous operation of the electronic device. You can achieve full results in the fight against rats and mice after 2 months.
When using an ultrasonic device against mice and rats, remember that ultrasound is repelled from a hard surface and absorbed by a soft one. Therefore, its use will be more effective in a room that is not cluttered with objects. To get rid of mice and rats in an apartment or private house, it is necessary to use devices of this type in all rooms at the same time, without giving rodents a chance to move from one room to another.
There are several ways to deal with a rodent infestation in your home yourself and practically free of charge. To make an ultrasonic mouse and rat repeller with your own hands, you do not need almost any expenses other than purchasing the initial equipment.
Rules for using repellers
In order for the use of ultrasonic repellers to bring maximum benefit, it is important to follow the basic recommendations for their use.
While the repeller is working against mice and rats, it is strictly forbidden to use other means of rodent control
Avoid food baits and special traps, since the purpose of the repeller is to create uncomfortable living conditions for rodents, while baits, on the contrary, lure them back. The effect of the ultrasonic device extends only to one room, devoid of partitions and walls, so to combat rodents in a multi-room apartment you will need several devices. It is also worth noting that the device works better in an empty room, without soft furniture and other interior elements. The point is that ultrasonic waves are absorbed by soft objects and repelled by hard ones, which means their action in an empty room will be more effective. A battery-powered mouse repeller is used exclusively at above-zero temperatures; it is irrational to use it in unheated rooms in winter (the batteries freeze and the device does not work). The mouse repeller must work continuously for at least 3-4 weeks. After this time (if the rodents have disappeared), a general cleaning of the room should be carried out and the slightest cracks and cracks through which other pests can enter the house should be eliminated
During operation of the device, it is important to maintain room hygiene - keep the room clean, hide and seal food, and remove garbage in a timely manner. The operation of devices in different rooms should take place simultaneously, since mice can move from one room to another without disappearing from your apartment
After eliminating rodents from a room, ultrasonic repellers should be turned off, since such devices are intended only to combat existing harmful inhabitants, and not to prevent their appearance. If the repellers work all the time, new mice and rats that move into your home will get used to the annoying sound from the very beginning, and the device will not affect them.
While the repeller is operating against mice and rats, it is strictly forbidden to use other means of rodent control. Avoid food baits and special traps, since the purpose of the repeller is to create uncomfortable living conditions for rodents, while baits, on the contrary, lure them back. The effect of the ultrasonic device extends only to one room, devoid of partitions and walls, so to combat rodents in a multi-room apartment you will need several devices. It is also worth noting that the device works better in an empty room, without soft furniture and other interior elements. The point is that ultrasonic waves are absorbed by soft objects and repelled by hard ones, which means their action in an empty room will be more effective. A battery-powered mouse repeller is used exclusively at above-zero temperatures; it is irrational to use it in unheated rooms in winter (the batteries freeze and the device does not work). The mouse repeller must work continuously for at least 3-4 weeks
After this time (if the rodents have disappeared), you should carry out a general cleaning of the room and eliminate the slightest cracks and cracks through which other pests can enter the house. During operation of the device, it is important to maintain room hygiene - keep the room clean, hide and seal food, and remove garbage in a timely manner. The operation of devices in different rooms should take place simultaneously, since mice can move from one room to another without disappearing from your apartment. After eliminating rodents from a room, ultrasonic repellers should be turned off, since such devices are intended only to combat existing harmful inhabitants, and not to prevent their appearance. If the repellers work all the time, new mice and rats that move into your home will get used to the annoying sound from the very beginning, and the device will not affect them.
By following all these recommendations, you will achieve maximum repellent effect, and this will allow you to remove mice and other rodents from your home very quickly and reliably.
Modern Kulibins will be interested in assembling a repeller according to the scheme themselves, purchasing everything they need from radio stores
What is the work based on?
The purpose of the device is to create high sound vibrations (frequencies from 30 to 70 kHz), to which rodents are sensitive. However, if the frequency is constant, then pests can adapt. Therefore, the ultrasound frequency must change periodically throughout the entire range.
When the device is operating, individuals experience an increase in feelings of danger and anxiety, which forces them to leave their homes.
Universal ultrasonic repeller
Features of ultrasonic repeller:
- When using a repeller, other methods of control are prohibited, such as poisons based on animal bait and various traps. Because with this device, which creates discomfort for rodents, they have the opposite effect.
- Ultrasonic waves are repelled by hard objects and absorbed by soft ones. Consequently, in a freer and more spacious room the device is most effective. Ultrasound does not pass through walls, so each room will need a separate repeller.
- The battery-powered device should not be used in unheated rooms in winter. Batteries will freeze in sub-zero temperatures.
- To achieve maximum effect, the device must be operated continuously for a month.
- Repellers in all rooms must work simultaneously so that rodents do not wander from room to room, but leave the house forever.
- This device is not used for prevention, so it is turned off after all pests have been eliminated.
How to make a device with your own hands?
For those who are familiar with electronics, making an ultrasonic mouse and rat repeller with your own hands is not difficult. On the Internet you can find many detailed diagrams and videos on assembling this device. Often the device consists of:
- variable and conventional resistors - they reduce the voltage in the network, regulate the level of ultrasound output;
- transistors - create a frequency circuit;
- capacitor – smoothes out current ripple in the circuit network;
- switch (toggle switch) – turns the device on and off;
- piezo emitter – produces ultrasonic signals – the main element of the device;
- diodes – protect the repeller from incorrect connection to the power supply;
- battery - crown or power supply.
Ultrasonic membrane
All parts and components can be purchased at a radio amateur store. In addition, you will need devices for soldering the radio circuit. The repeller dimensions are compact. No special device settings are required. You may just need to adjust the frequencies.
Stages of work
There are several options for assembling an ultrasonic rodent repeller with your own hands. You need to choose a specific circuit based on the power of the future device, available parts, soldering skills and much more.
Most often, the basis of the repeller is a board with soldered tracks that connect the elements of the microcircuit. However, in the simplest models, the parts are connected using wires.
However, regardless of the assembly method you choose, the general algorithm of actions will be as follows:
Ultrasonic repeller circuit
- Choose a repeller design based on your personal needs.
- Buy the necessary radio components. You can easily find some parts at home. For example, the speaker can be removed from an old receiver or tape recorder.
- Prepare a soldering iron and auxiliary substances (tin, rosin, flux, acid, etc.).
- Solder the base of the ultrasonic repeller - a symmetrical multivibrator, according to the selected circuit.
- Connect the speaker and battery. A slightly perceptible squeak should appear in the speaker.
- If there is no squeak in the speaker, or it is too strong, you need to increase or decrease the frequency of the device accordingly. This is done by increasing or decreasing the capacitance of the capacitors by 0.1 μF.
The simplest ultrasonic device for repelling rodents is ready. To make a more complex repeller that will automatically change the oscillation frequency, you will need serious equipment and considerable skills in calculations and soldering of microcircuits.
How to make an ultrasonic gun with your own hands? (video)
Types of rodent repellers
Typically, mice settle near people when there is access to food or with the onset of autumn cold weather. Animals reproduce very quickly, in particular, this is one of their methods of survival in extreme conditions. Rodents successfully adapt to most common poisons used by people to kill them, and avoid the most ingenious traps.
Sometimes rodents are not bothered by special mechanisms designed to destroy them.
When a large number of mice are infested, the only way to get rid of them is to use repellers, among which the most common are ultrasonic, magnetic pulse and combined electronic devices.
Ultrasonic repellers
This type of device emits high-frequency sound vibrations that exceed the human hearing threshold of 20 thousand Hertz. For mice, such a signal with sufficient sound pressure can become a real disaster - the pests panic and strive to leave the territory that is uncomfortable for them as soon as possible. An important advantage of such a repeller is that mice leave the room alive.
Video: testing ultrasonic emitters
https://youtube.com/watch?v=zgqfkcsWIsA%3Ffeature%3Doembed
High-quality models of ultrasonic devices have the function of automatically switching emitted frequencies, so rodents do not have the ability to adapt to sound waves.
The propagation of ultrasound depends on many factors, the main one of which is the presence or absence of barriers and noise absorbers in the path of the wave. Walls, partitions and furniture can act as obstacles; carpets, upholstered furniture and thick curtains strongly absorb radiation. On the other hand, hard surfaces contribute to the re-reflection of ultrasound, which can be useful to a certain extent.
Reflection of ultrasound contributes to higher efficiency of the repeller
Ultrasonic repellers are easy to install and use, they are powered by a household outlet or battery. Some gadgets are powered by solar batteries. Typically, such devices are connected on an ongoing basis for several days or weeks. After the complete disappearance of pests, the device is usually turned on periodically for preventive purposes.
Popular ultrasonic repellers include:
- Typhoon LS-800,
- Chiston 2 Pro,
- Tornado 400,
- EcoSniper LS-927.
Electromagnetic emitters
The operating principle of electromagnetic devices is based on magnetic pulse radiation using home electrical wiring. By plugging such a device into any outlet in the house, you can get full coverage of all rooms where electricity is installed.
By generating low-frequency waves, the magnetic resonance repeller has an irritating effect on rodents, who, experiencing panic attacks, rush to leave the building. According to manufacturers, electromagnetic pulses are completely safe for people and pets and selectively affect mice and rats. Electromagnetic effects on mice cause panic attacks in the latter
Magnetic-electric pulses pass through walls and large objects, but metal structures reduce the efficiency of the electromagnetic emitter. The big advantage of this class of repellers is complete coverage of the premises, regardless of where the device is connected.
It is claimed that magnetic-electric devices for repelling rodents begin to work immediately after switching on and completely clear the house of uninvited guests within one to two weeks. In practice, it can be very difficult to judge their effectiveness due to the small amount of objective information, and many negative user reviews raise doubts about the normal performance of such gadgets.
The most popular electromagnetic repellers are:
- Pest Repeller,
- Pest Reject.
Combination devices
Combined rodent repellers are the most versatile and technologically advanced devices. They generate both ultrasonic vibrations and magnetic resonance radiation. Some devices are equipped with sources of light pulses, which are believed to additionally affect the nervous system of pests. The fusion of several technologies, according to the developers, makes it possible to get rid of mice for a very long time.
Popular combination repellers include models such as:
- Grad A-1000 Pro,
- ElectroCat.
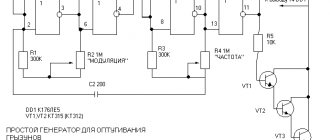
Generator circuit for repelling rodents
- The electrical circuit of the generator includes an ultrasonic vibration generator (C3, C4, DD1.3, DD1.4, R3, R4), a low frequency modulator (C1, C4, DD1.4, R1, R2), a power amplifier using transistors VT1- VT3, emitter, which uses a high-frequency loudspeaker 4GDV-1.
- The generator emits frequency-modulated oscillations in the range of 15....40 kHz. The frequency can be adjusted by resistor R4, the modulation frequency is adjusted by resistor R2 within 2...10 Hz.
- If you set contact SB1 in such a way that in case of unauthorized entry into the room this contact closes, the generator can work like a security alarm siren, since it begins to emit frequency modulation in the range of 1000...2000 Hz.
- It is important that when working for a long time in one frequency range, rats get used to it, so you need to change the radiation parameters with resistors R2-R4 2-3 times a week. Or connect capacitor C4 to a piece of wire that creates an additional capacitance that changes with changes in temperature and humidity. Then the frequency will change randomly
We make a device at home that frightens pests
The creation of such devices does not require special skills or special knowledge; any novice radio amateur will be able to assemble them with his own hands, based on the included instructions and diagrams.
For this you will need:
- regular soldering iron,
- parts R7, R5, C6, C5, DD1.3, DD1.4.
Using a soldering iron, a symmetrical multivibrator is assembled from parts; it is the basis of the entire device.
The frequencies of the emitted ultrasonic waves can be adjusted by adjusting the generator. The signals emitted by the generator are fed to a device that amplifies their power.
The emission of ultrasonic waves occurs due to the operation of the Sp1 element.
The strength and frequency of oscillations can be calculated using the formula F=1/(R5xC6+R7xC5).
To assemble a more complex device with your own hands, capable of constantly automatically changing the range of ultrasound vibrations, you will need a higher level of skill and skill. You can do it based on the proposed scheme:
Modulation of the frequency of the emitted ultrasound occurs after a certain time interval. Setting up the device is carried out in stages and begins with determining the operating frequency of the generating element.